

You May Also Like Extension
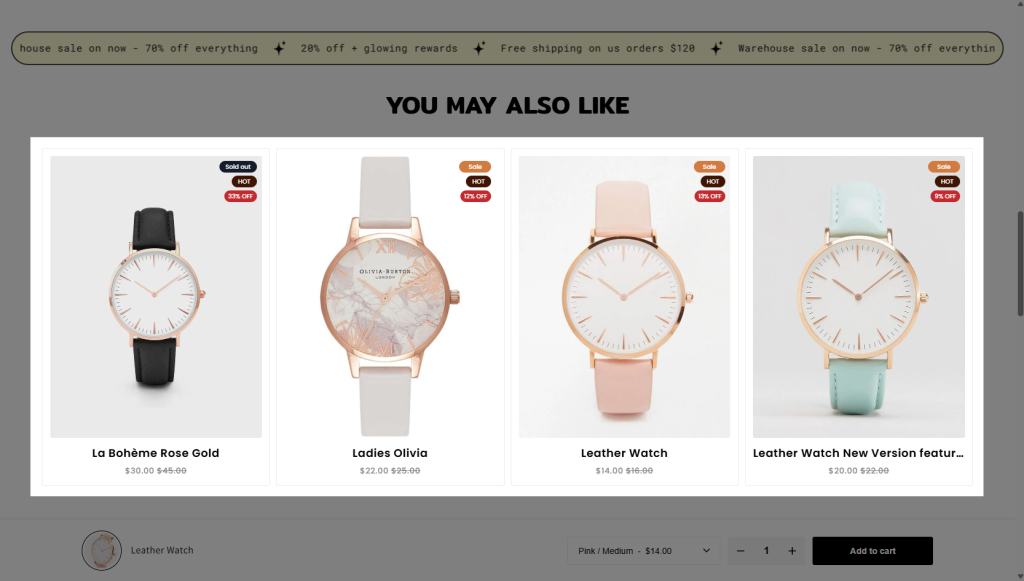
You May Also Like extension by EComposer allows you to add product recommendations to a single product page. (EComposer hasn’t supported automatic related products by rules)
Normally, you will see related products under these blocks: “More items like this”, “People also buy”, and “Similar items”. You have freedom while picking related items manually.
Note: You can use this extension on EComposer Pro and Premium plans. Upgrade now to unlock
1. How to install the You May Also Like extension?
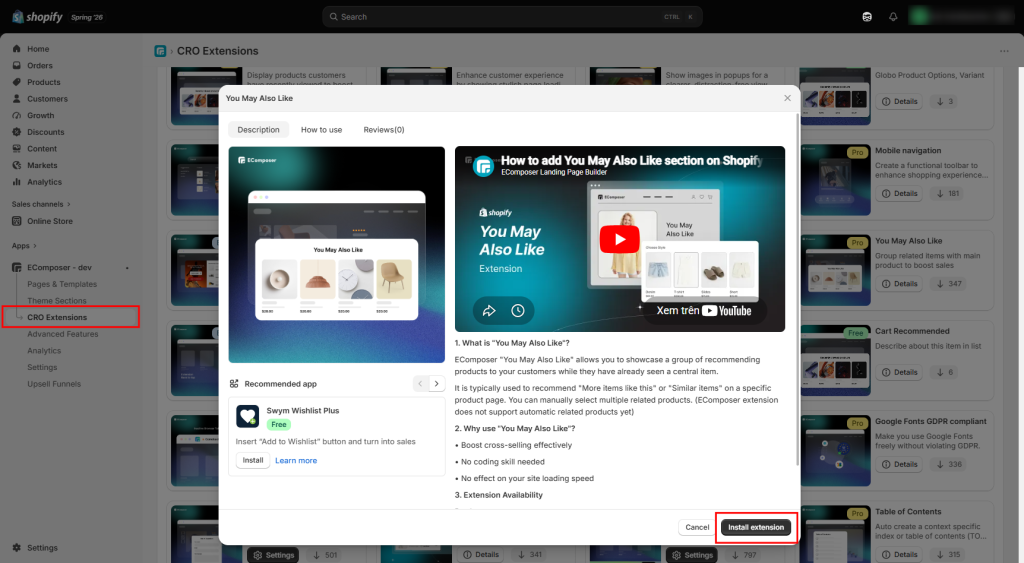
Step 1: From your EComposer dashboard, go to CRO Extensions from the left sidebar menu.
Step 2: Search for the You May Also Like extension.
Step 3: Click Details and install the extension on your store.
2. Call the Extension to the Editor & Customize
Inside the EComposer editor, open the Extensions tab from the left sidebar, then find the You may also like extension from the installed extensions list and drag it into your desired position on the page. After adding it successfully, you can start customizing the extension settings and style.
2.1. Show certain products
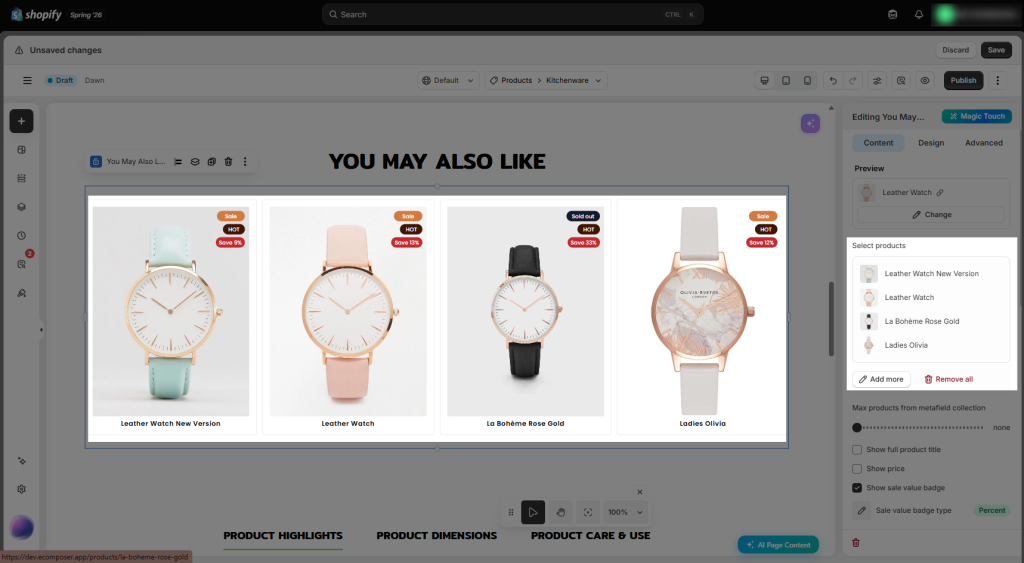
Select product: Manually pick which products appear in the You may also like extension. The products selected in the Editor will be applied across all product pages and cannot be set dynamically for individual products.
If you’re using a single product template for all products, we recommend using Shopify metafields to pull product data instead.
Note: If you select certain products in Ecomposer Editor, they will show as a priority. If not, it will show the products that you had picked in Product Metafield.
2.2. Show Metafield products
By using the metafield selector, you’ll be able to choose different products to display for each product page individually. This means the same selected products won’t be shown across all product pages.
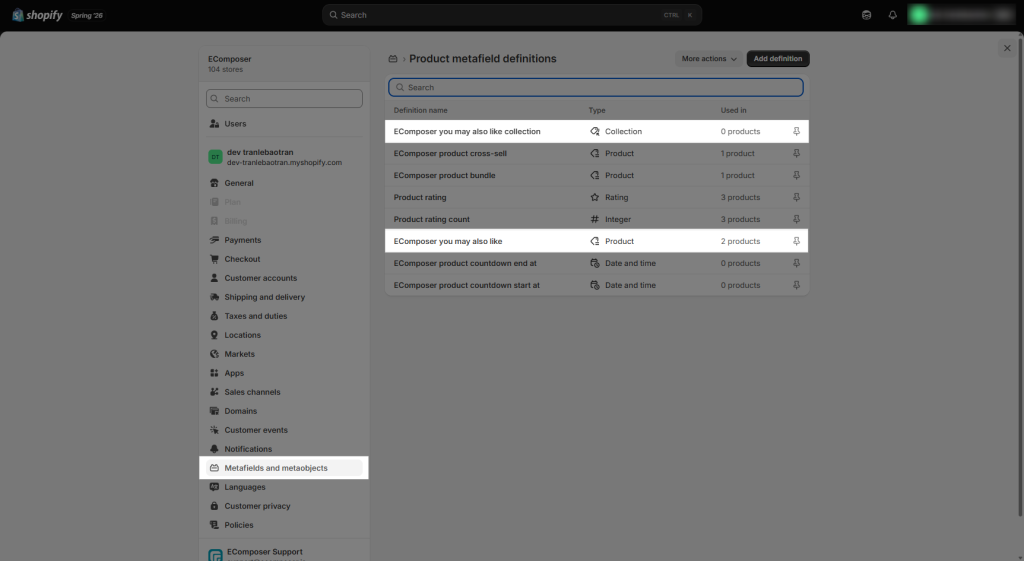
After installing the extension, the EComposer you may also like collection metafield + EComposer you may also like metafield will be added to Shopify.
- EComposer you may also like collection allows you to select a collection to display dynamically for different products.
- EComposer you may also like allows you to select products that are displayed dynamically for different products.
Please go to Shopify Settings -> Metafields and metaobjects -> Products to check if the Metafield is there or not.
=> If you’re using a single product template for all products, we recommend using Metafields to assign different selections for each product. For more details, please refer to the guideline below.
- Step 1: Open the Main Product.
- Step 2: Scroll to Metafield → click Show All.
- Step 3: Find the EComposer you may also like metafield.
- Step 4: Select the relevant products and drag & drop to reorder the display list.
As a result, you don’t need to select any products manually. It will automatically display the products (in order) based on what you selected in the EComposer you may also like metafield.
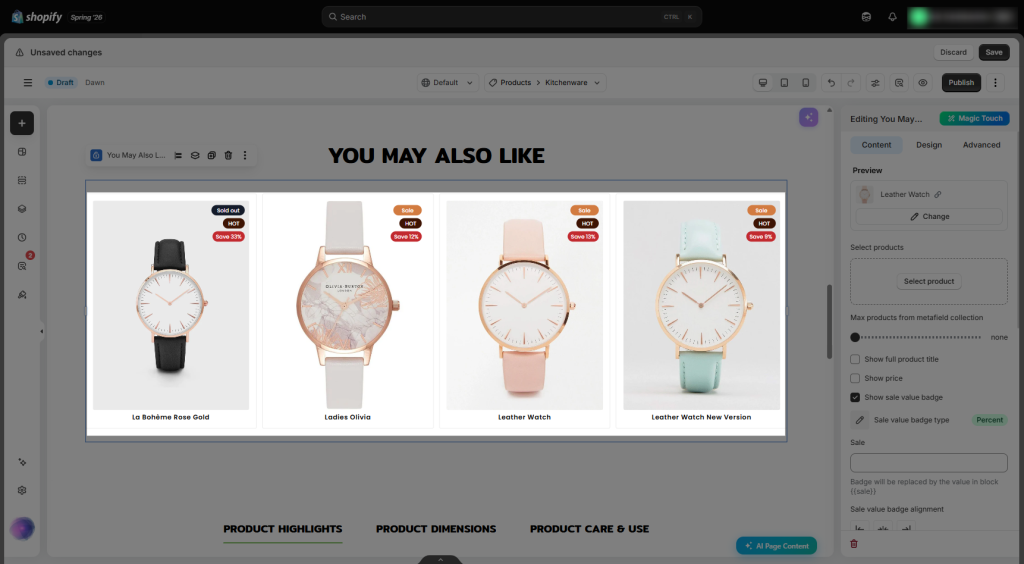
3. How to configure the You may also like extension
3.1. Content
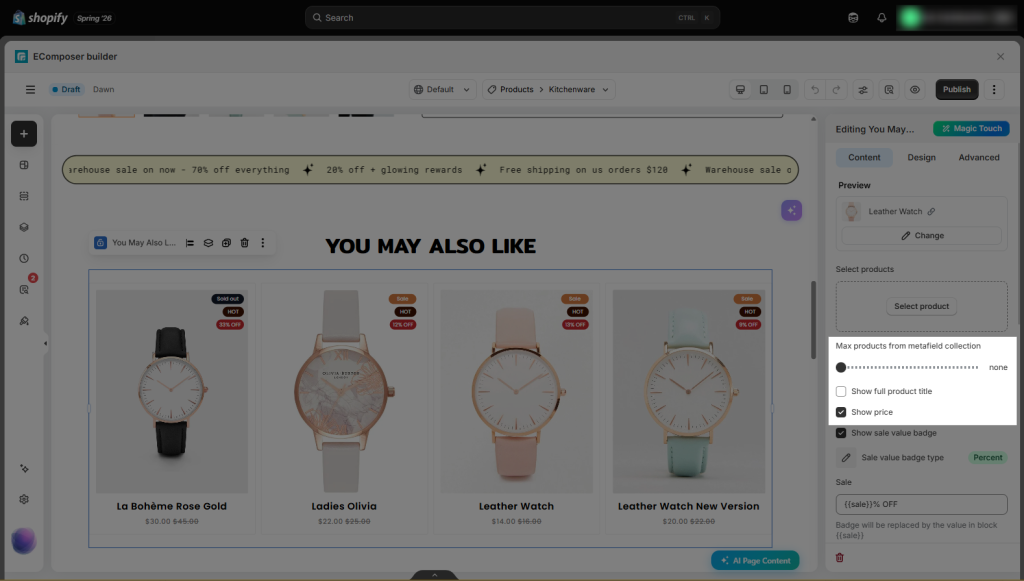
- Max product from metafield collection: This allows you to limit the products displayed from the collection selected in the “EComposer You May Also Like collection” metafield.
- Show full product title: By default, the product title is displayed on a single line. You can enable this setting if you’d like the full title to be shown.
- Show price: Tick this setting to make the price visible.
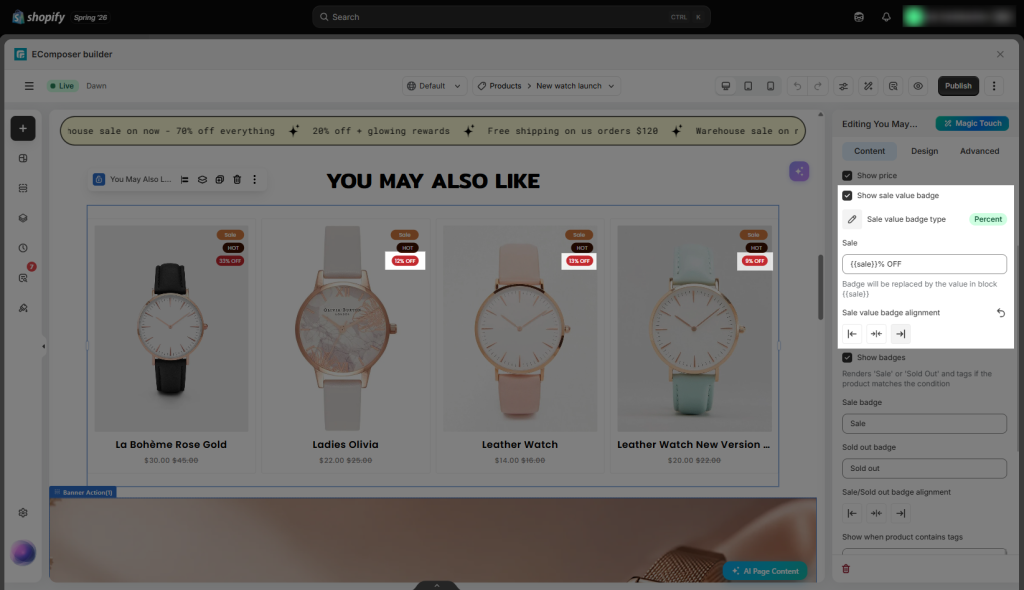
- Show sale value badge: Displays a sale badge with the discount value (such as Sale 20%)
- Sale value badge type: Choose whether to display the discount as a percentage or an amount. This badge is only shown for products with a Compare at Price.
- Sale label: Lets you enter the text you want to display before or after the discount value (Sale up to 20% or Save $40 today)
- Sale value badge alignment: Lets you change the position of the sale value badge.
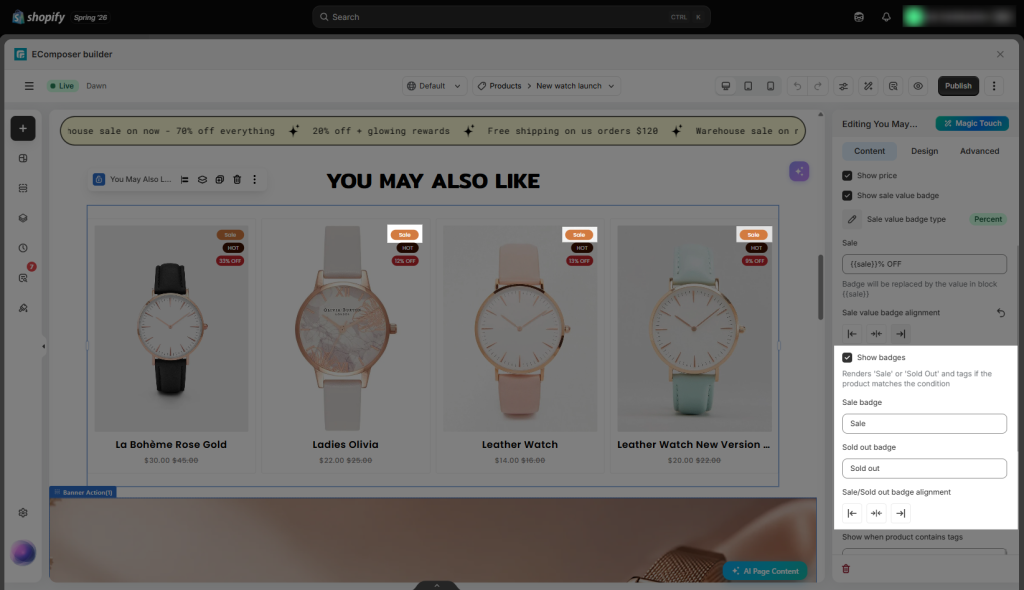
- Show badge: Displays the Sale badge when a product is on sale. Similarly, the Sold Out badge is displayed when the product is out of stock. You can also change the alignment of the Sale and Sold Out badges using the Sale/Sold Out badge alignment setting.
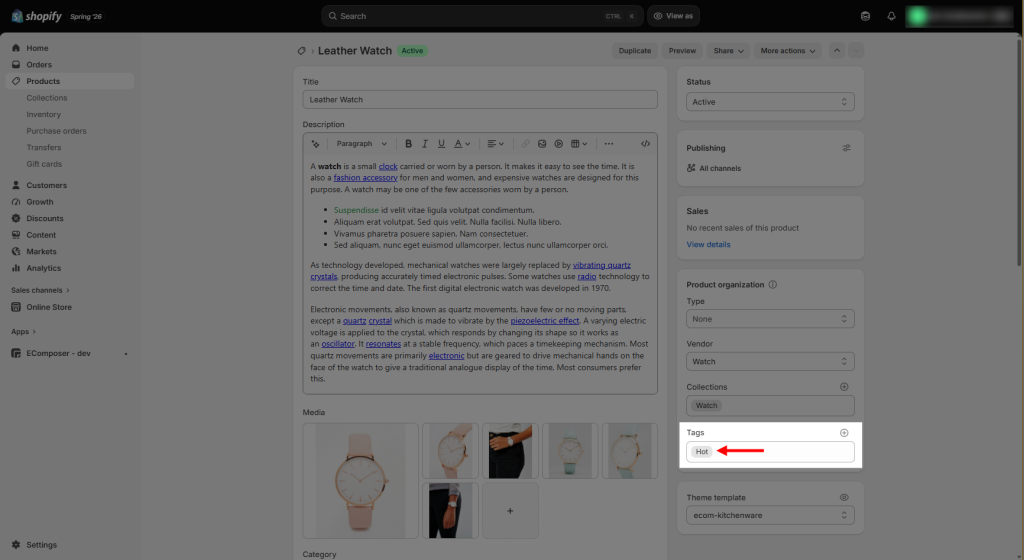
- Show when product contains tags: This feature allows you to display custom labels on product items based on their assigned tags. For example, if you’d like to display a “Hot” label, simply add the “Hot” tag to the product and enter the corresponding tag name in this option. The label will then be displayed automatically on the product item.
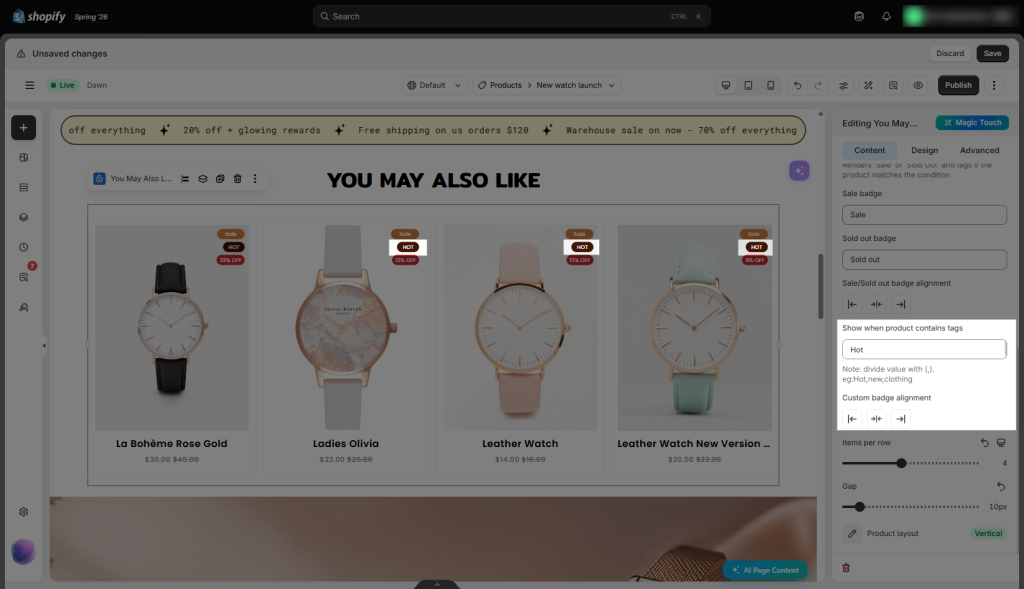
- Items per row: Lets you adjust the number of items displayed in a single row.
- Gap: Lets you modify the spacing between each item.
- Product Layout: This option lets you choose whether the content inside each item is displayed in a vertical or horizontal layout. As shown in the screenshot, it is currently using the vertical layout.
3.2 Design Settings
- General: This enables you to customize the extension’s background colour, box shadow, and border.
- Items box: You can modify your design by changing the background colour, the box shadow, the border, the hover animation, and the transition.
- Title: This option will let you change some basic designs of Product name such as the font style, position, etc.
- Compare at price: change the style of sale price to differentiate it from the regular price
- Sale value badge: change the style of % or amount badge
- Sale badge: adjust the appearance of Sale text
- Sold out badge: adjust the appearance of Soldout text
- Custom badge: adjust the appearance of a custom badge you add yourself. This badge works following product tags.
- Image: This option allows you to adjust the image fit for the product image, as well as its opacity in both the normal and hover states. You can also customize the border style and border radius.





1 Comment
Rainy Pham
cool feature