AI Product Import
Creating a product template manually can take time. You need to select a product, build the page layout, add product images and information, and create content for different sections. AI Product Import helps simplify this process. Start with a product, choose a template, and let AI generate the product template using your product data.
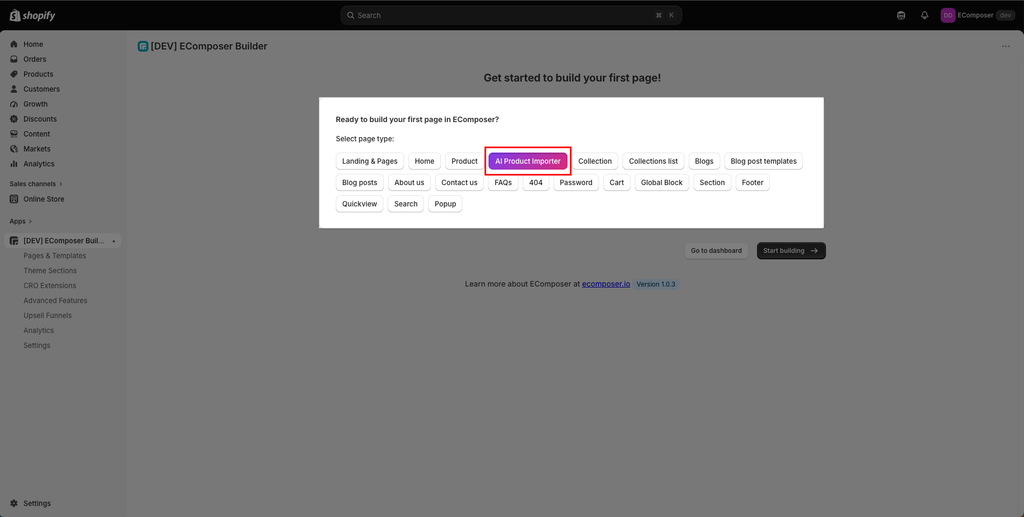
To start using it, go to EComposer Dashboard -> Start Building -> AI Product Importer.
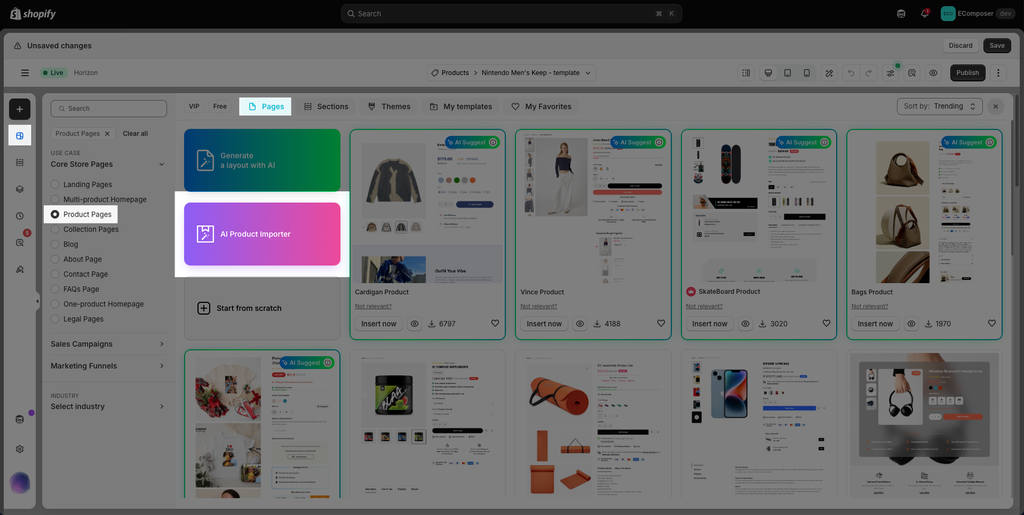
Or from EComposer’s Template Library -> Pages -> Product Pages -> AI Product Importer.
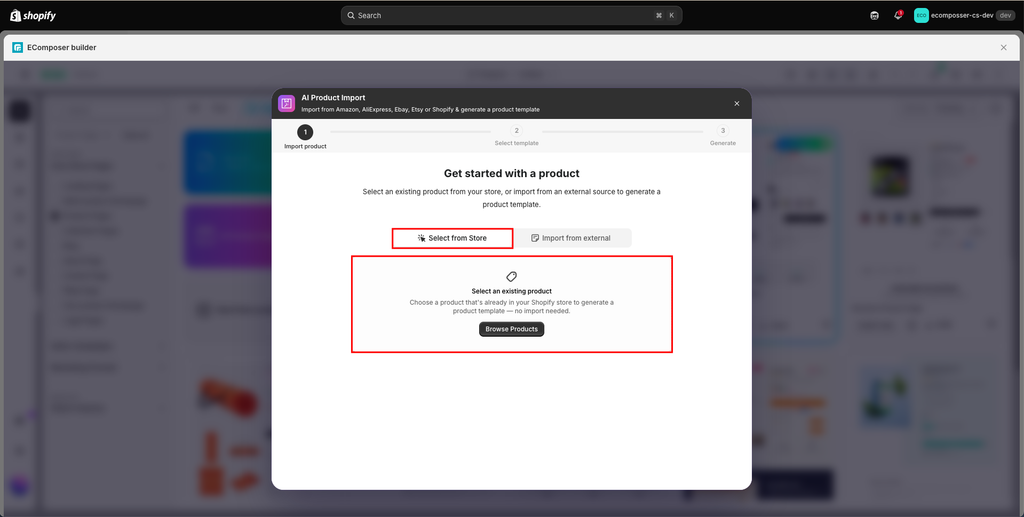
There are two options:
- Select from Store: Use an existing product from your Shopify store.
- Import from external: Import product data from external marketplaces such as Amazon, AliExpress, eBay, or Etsy using the EComposer Product Exporter Chrome Extension.
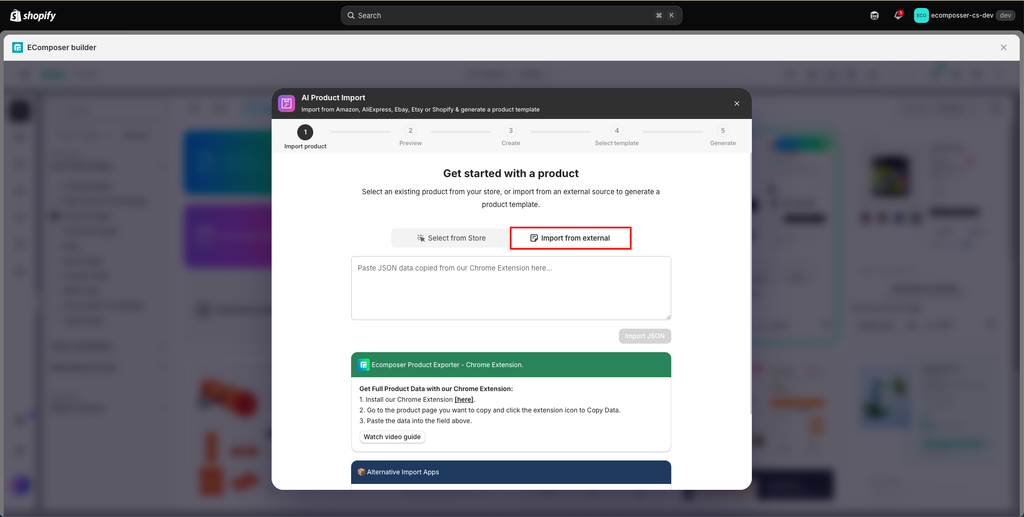
Once the product is ready, simply select a template and EComposer AI will generate the page content for you. You can then open the generated template in the EComposer editor and customize it as needed.
This feature will mainly:
- Directly map core attributes (title, price, media, variants) to dedicated template elements.
- Rewrites product information to align with the selected template’s brand tone.
- Generates placeholder text using AI if a template section (such as an FAQ) lacks product data.
1. How to use AI Product Import
1.1 Select from Store
You can use this Select from Store option when you already have a product in your Shopify store and want to build a new product template for it. EComposer will use the product information already available in Shopify, so you don’t need to import or enter the product data again.
Please follow the steps and video below to use this option:
Step 1: You need to pick the product you want to build with AI from EComposer by choosing Browse Products, then find and select the product you want to create a new template for.
Step 2: Select a Product Template that works well with your product information, such as its images, variants, description, and other available content.
Step 3: Click Generate Page with AI. EComposer will use the product data from Shopify to fill the selected template and generate additional content where needed. Once generation is complete, your product template is ready for further customization in the EComposer editor.
1.2 Import from external
Use this Import from external option when you want to import a product from an external marketplace, such as Amazon, AliExpress, eBay, or Etsy, into your Shopify store. Instead of creating the product manually in Shopify and entering its information one by one, EComposer helps you import the available product data and create a new product in your Shopify Admin.
To import product data from an external marketplace, you’ll need to install the EComposer Product Exporter Chrome Extension. The extension is used to scan the product page you’re viewing and collect available product information, such as the title, description, images, price, variants, specifications, and reviews. It then converts the collected information into JSON data that can be imported into EComposer.
Using the extension is recommended because some marketplaces may prevent EComposer from retrieving complete product information directly. Without the extension, some product data may be missing.
Please follow the steps below:
Step 1: Install the EComposer Product Exporter extension and import the product from an external marketplace into EComposer.
- First, please install the Product Exporter extension from the Chrome Web Store via this link.
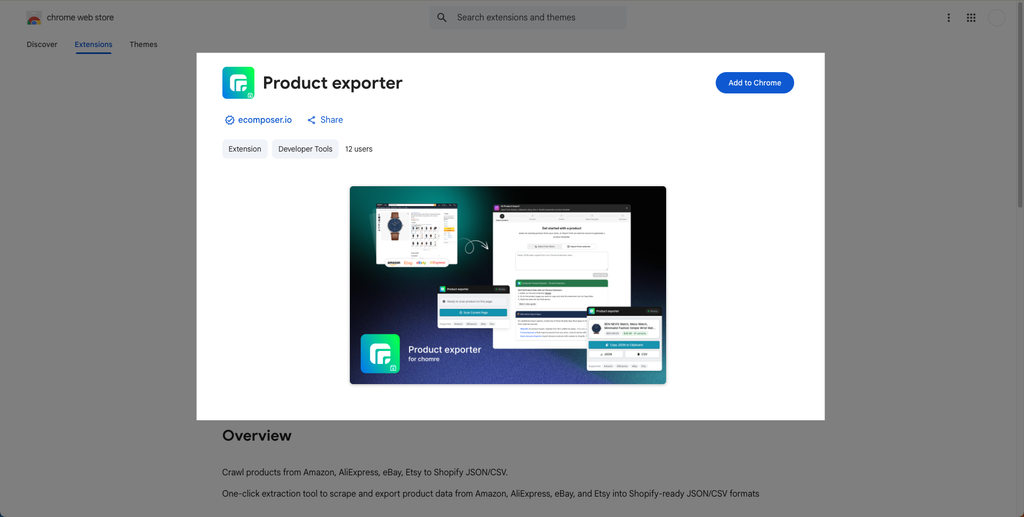
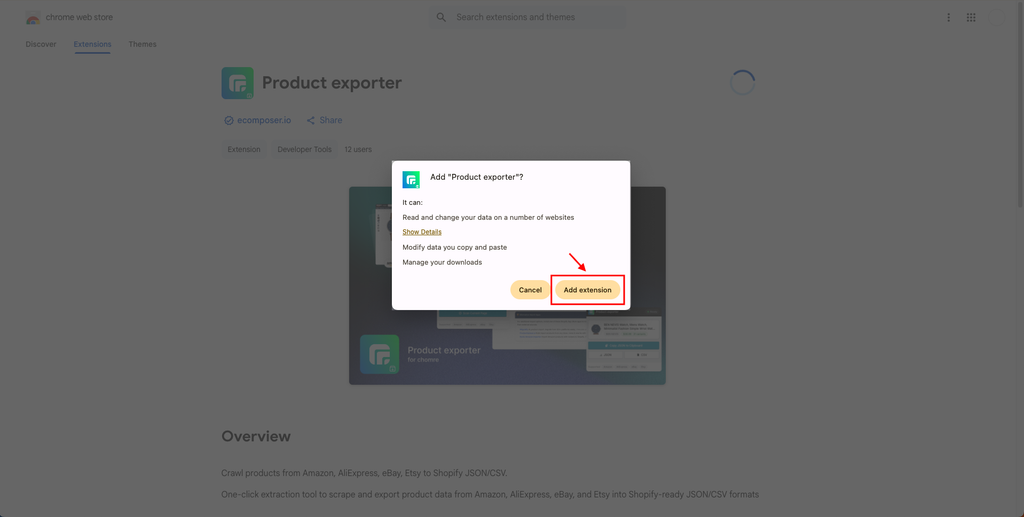
- Click Add extension to install it to your browser.
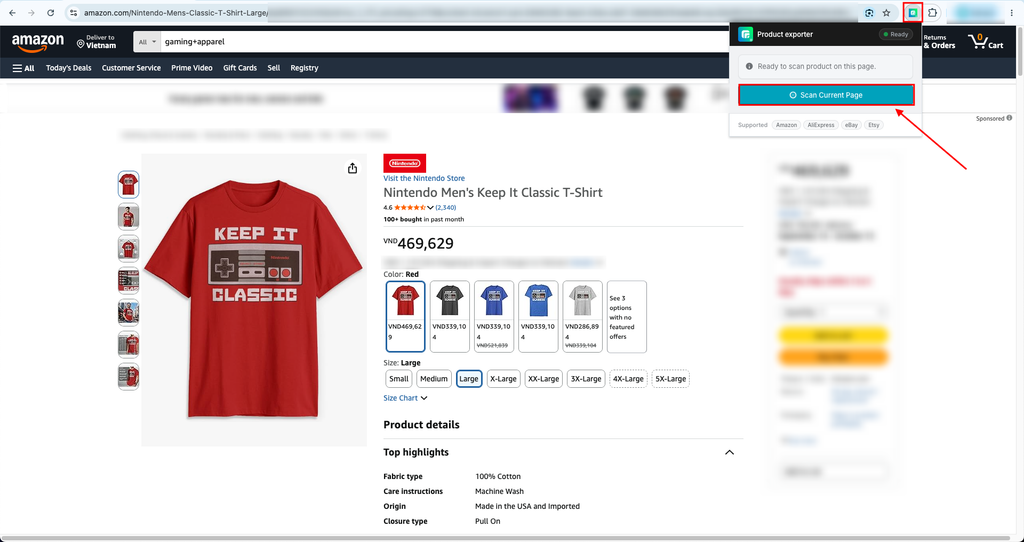
- Go to any products from an external marketplace. For example, we get this product from Amazon. Click into the Product Exporter extension icon on the top right corner and hit Scan Current Page to get the JSON data of the current product.
- Click the Copy JSON to Clipboard button.
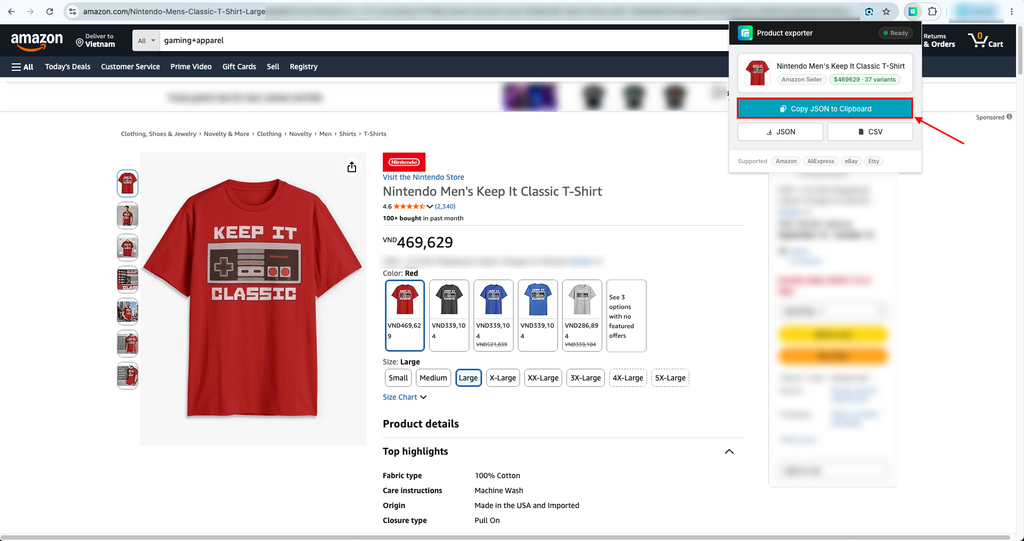
- Go to EComposer, and paste the JSON data you just copied. Then click the Import JSON button.
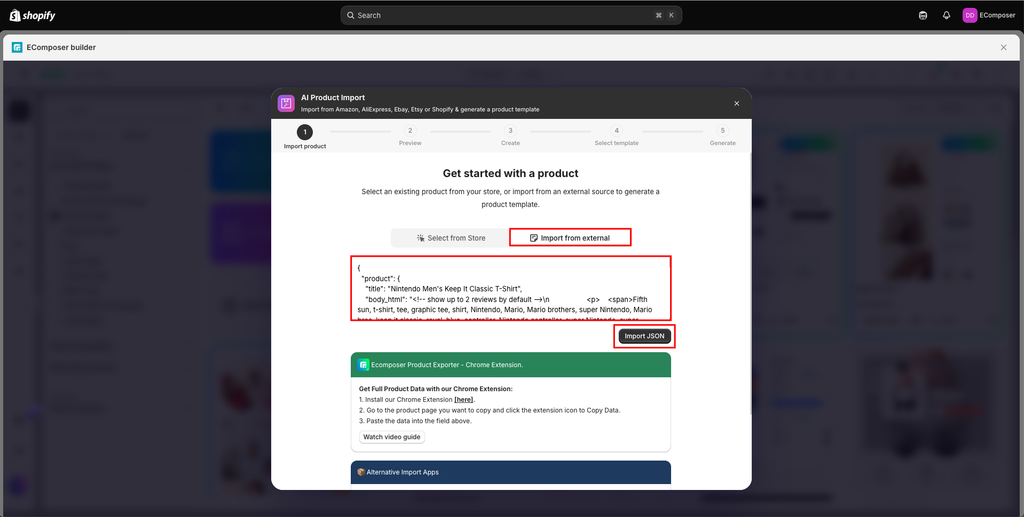
The available product information may include: Product title, Description, Images, Price, Variants, Specifications, Reviews, when available. The actual information retrieved may vary depending on the source product page.
Step 2: You can preview a product in this step, including all product information.
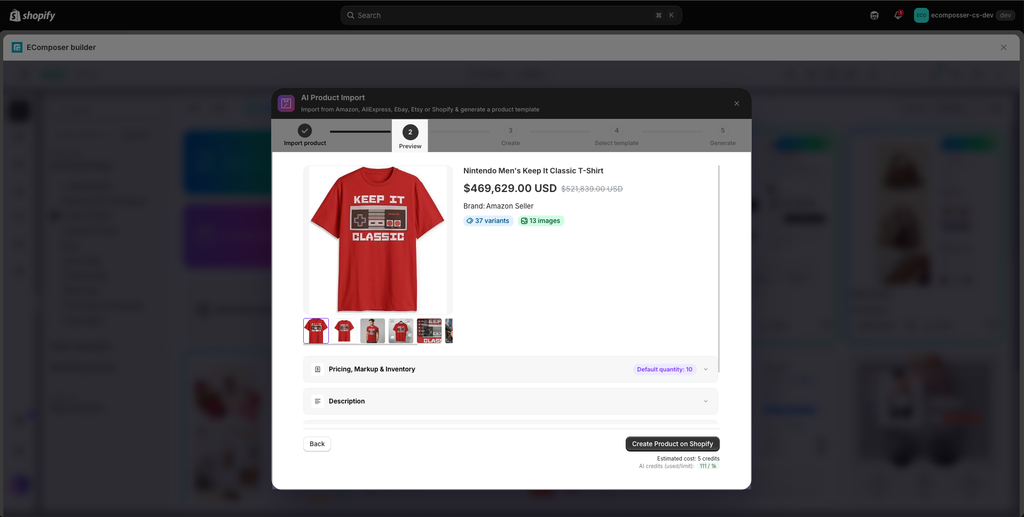
AI Credits: Using this option consumes AI Credits from your current EComposer plan. You can check your available credits and the estimated credit cost before proceeding. Learn more about AI Credits here
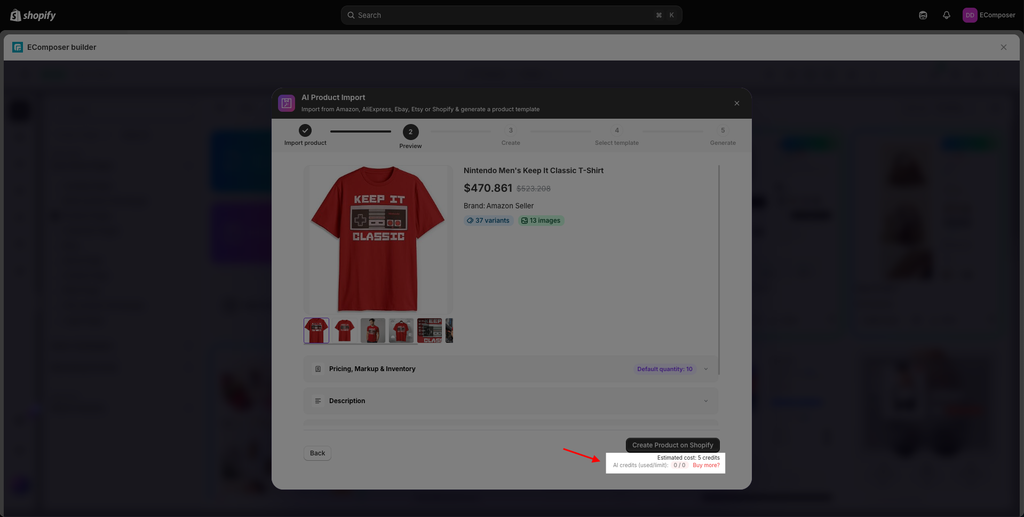
If you run out of credit, the popup will be shown to let you buy more.
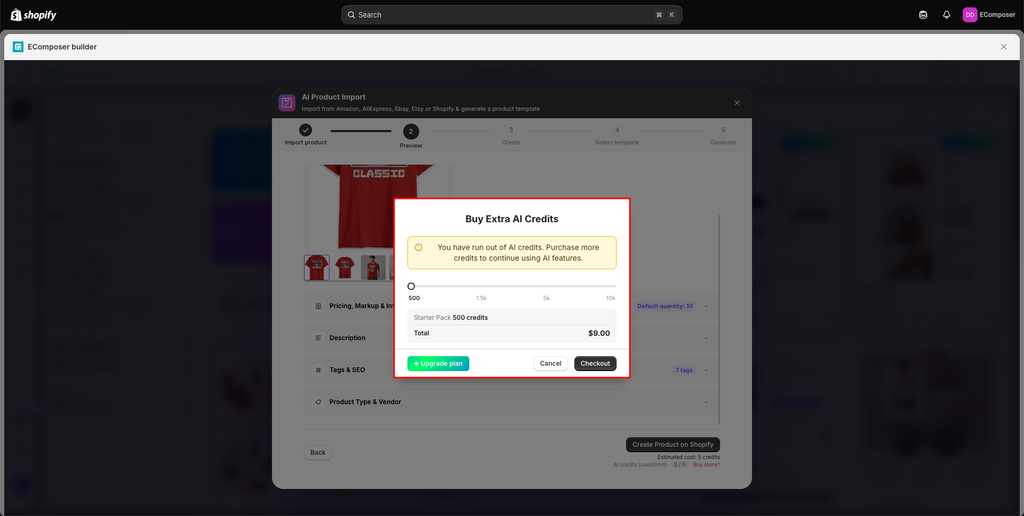
If you still have enough credit to create a product, move to the next step.
Step 3: After that, you need to click the Create Product on Shopify button to start creating this product to your Shopify store.
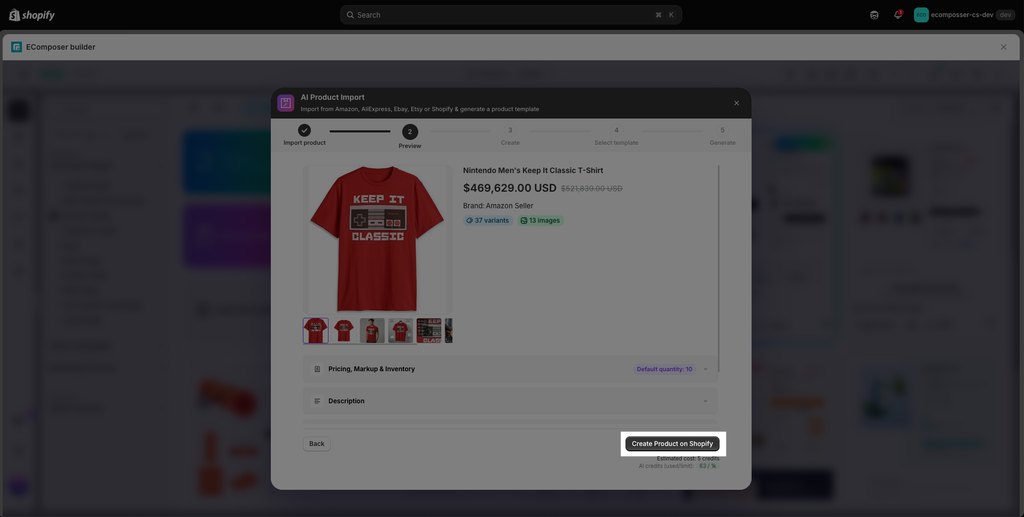
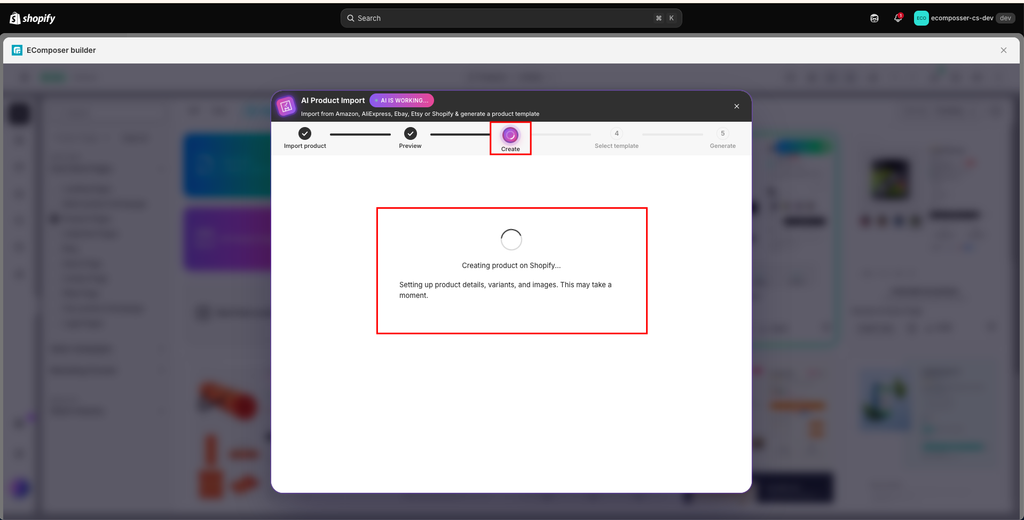
- AI will create a product for your Shopify; all the images, product title, product description,… will be added to that product from Shopify admin as well.
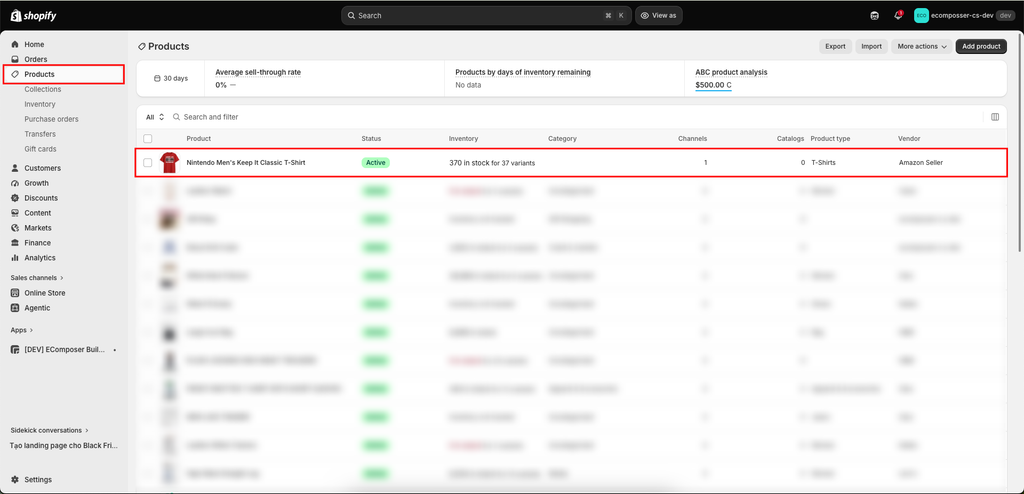
- You can check inside the Shopify admin -> Products to see the product has been created:
Step 4: Select a Product Template. After creating the product successfully in your Shopify store, you’ll be taken to Select template. You can browse the available product templates and select the layout you want to use.
You should consider the available product images, variants, description, specifications, and other content when selecting a template.
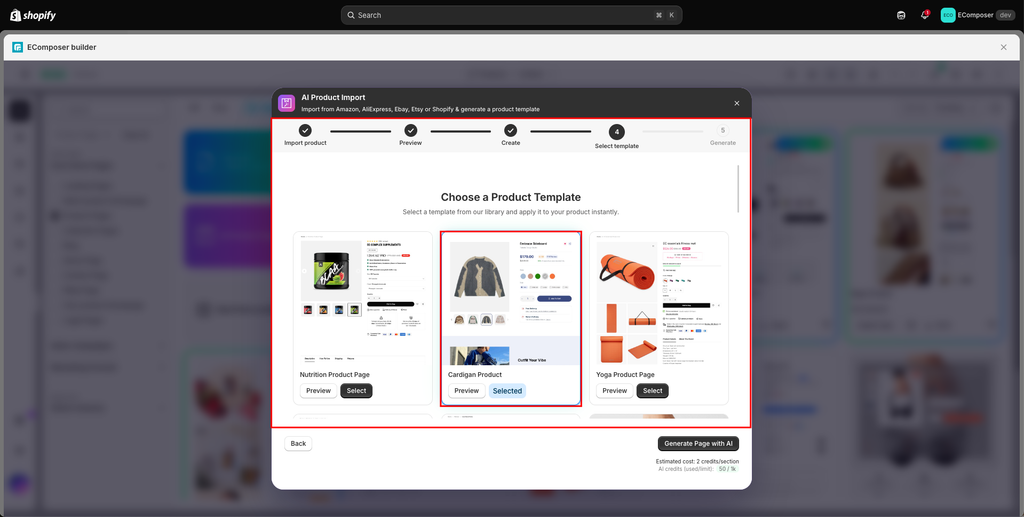
Step 5: Generate the Product Template. Click Generate Page with AI. EComposer will use the imported product data to fill the selected template and generate relevant content where needed.
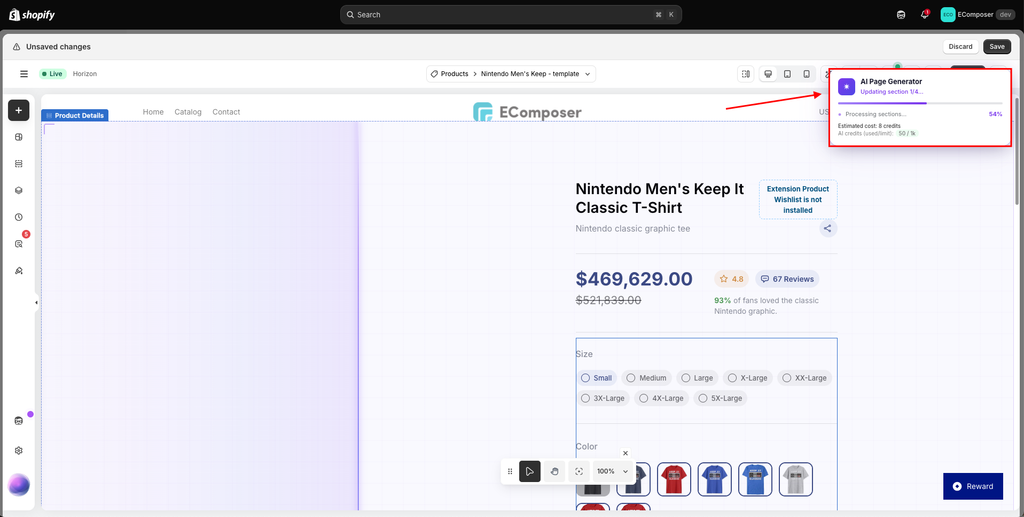
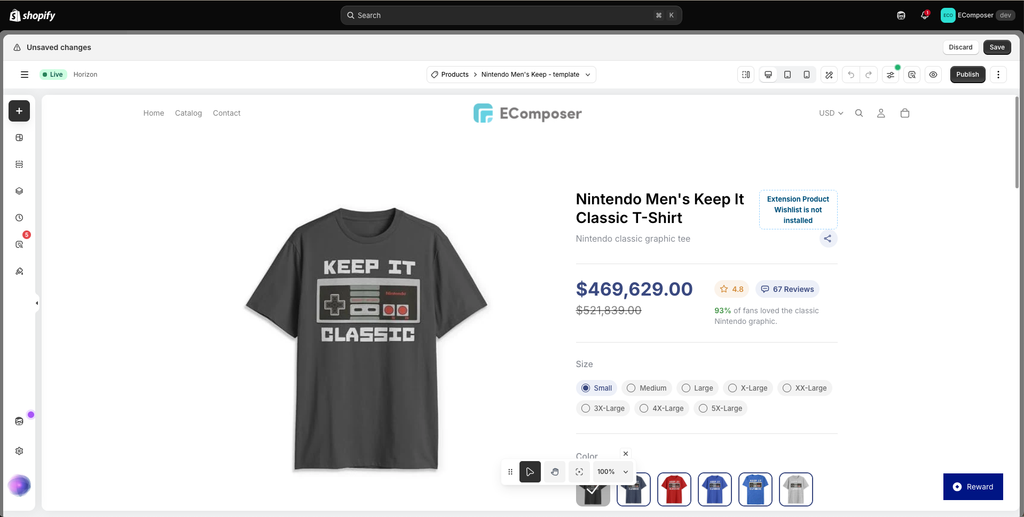
Once generation is complete, you can continue customizing the product template in the EComposer editor.
2. Customize the generated Product Template
After clicking Generate Page with AI, EComposer builds a complete product page by mapping your product data and AI-generated content into the selected template. You can open it in the EComposer editor and continue customizing it as needed.
You should follow these steps in the EComposer Editor:
Step 1: Review and Edit Content
- Product Details: Check the imported product data (title, price, variants, description, media) to ensure complete accuracy.
- AI Content: Review AI-generated sections (such as FAQs or feature callouts). Click directly on any text block to rewrite, refine, or align the tone with your brand voice.
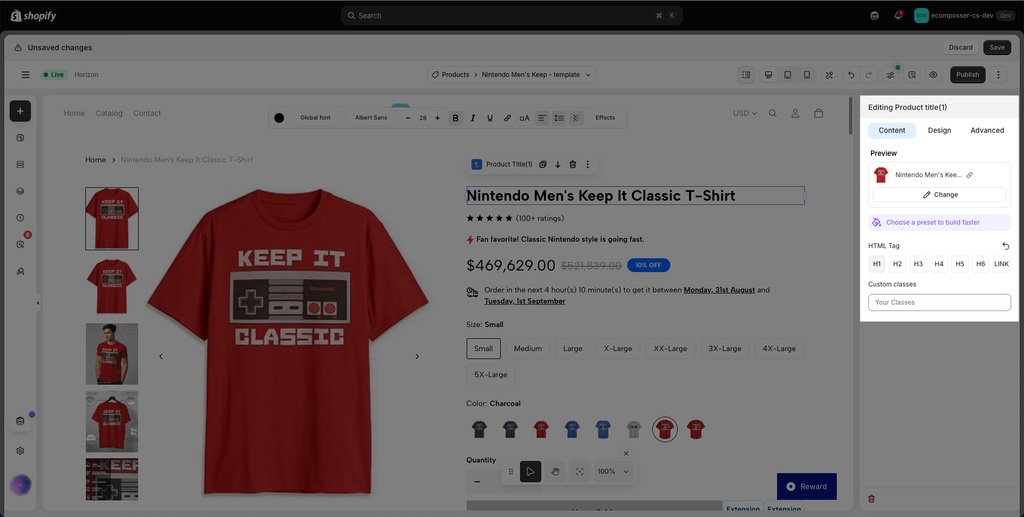
Step 2: Adjust Page Layout & Media
- Rearrange Sections: Drag and drop elements or sections to change their display order based on your need.
- Add/Remove Elements: Add new sections from the EComposer library or remove any default template sections you don’t need.
- Update Images: Upload additional product photos where necessary.
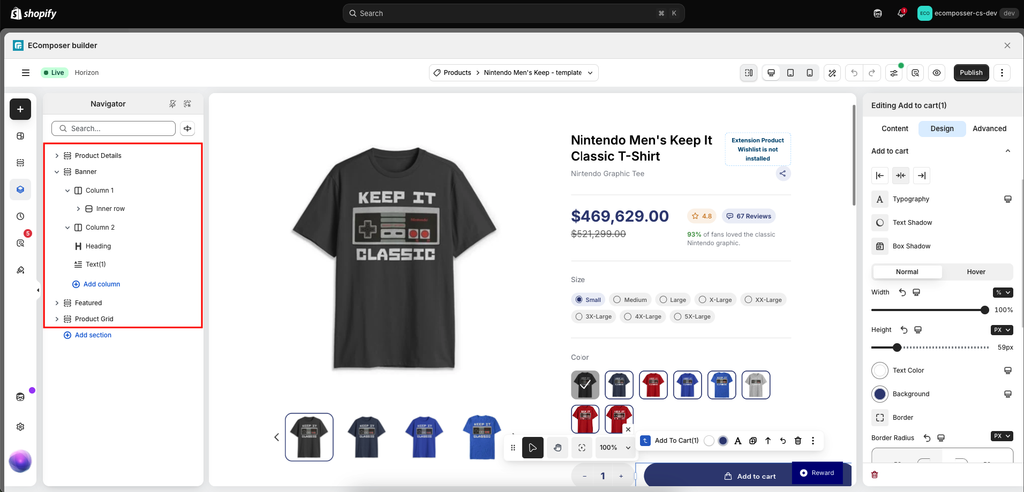
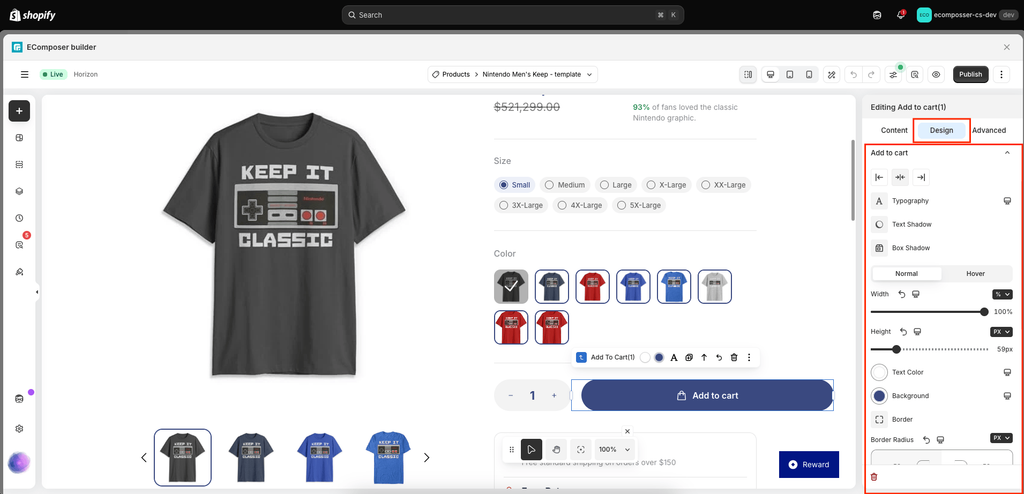
Step 3: Style & Design Customization
- Customize colors, typography, button styles, and spacing to match your storefront’s branding.
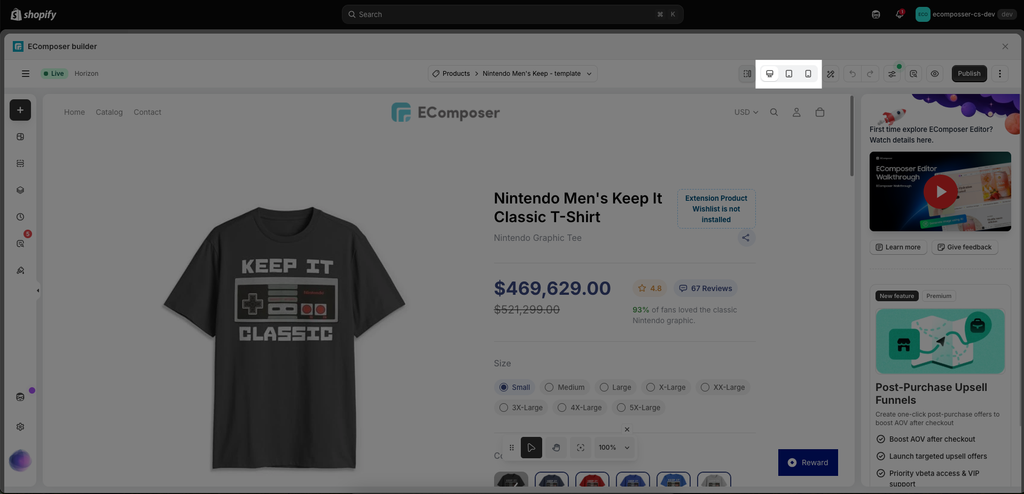
Step 4: Preview Mobile & Responsive Layouts
- Switch between Desktop, Tablet, and Mobile views in the top bar of the editor to ensure your product page looks optimized on all screen sizes.
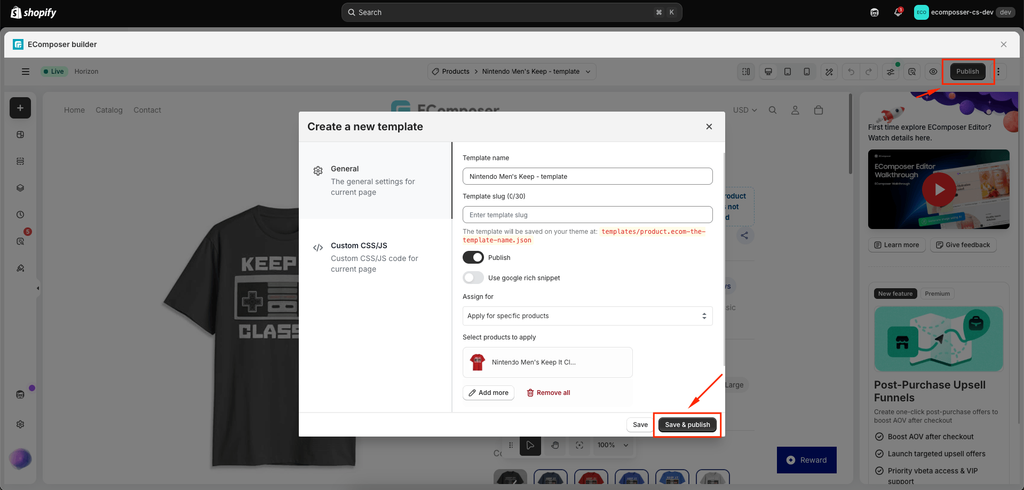
Step 5: Save and Publish
- Click Save to keep your progress, then hit Publish when you are ready to make the product page live on your Shopify store.
Note: Always review the product information and AI-generated content before publishing to make sure it accurately with your product.
3. Important notes
- Use Import from external for products from supported external marketplaces such as Amazon, AliExpress, eBay, or Etsy.
- For external products, we recommend using the EComposer Product Exporter Chrome Extension to retrieve more complete product data.
- AI-generated content is based on the available product information and may require further editing.
- Generating a product template with AI consumes AI Credits and you might need to buy more credits.
- Always review your product information and AI-generated content before publishing to make sure it matches your store.