Volume Discount
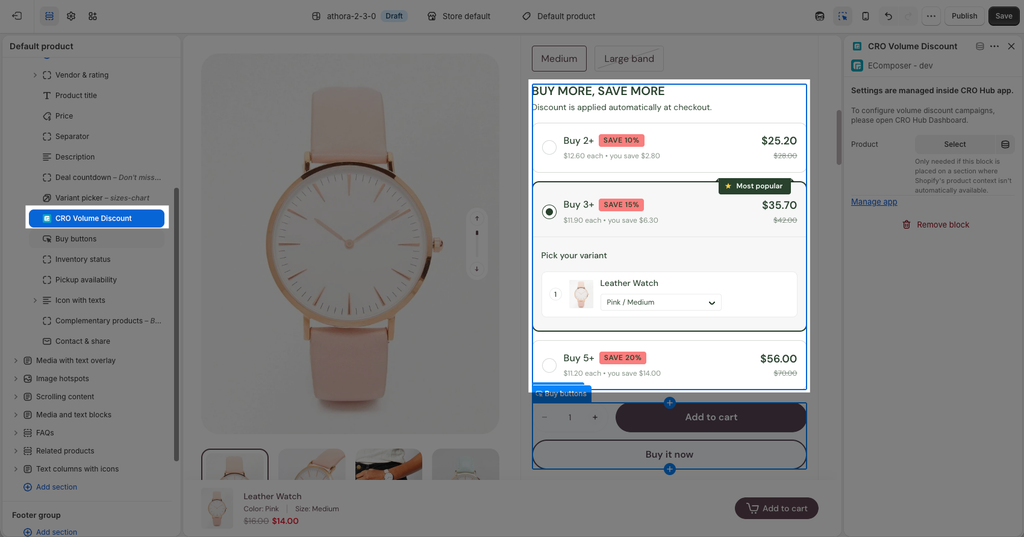
The Volume Discount extension helps you encourage customers to purchase more by offering discounts based on the quantity they buy. You can display volume discount offers directly on your product pages, allowing customers to easily choose a quantity and unlock a better price.
For example:
- Buy 2+ → Get 10% off
- Buy 3+ → Get 15% off
- Buy 5+ → Get 20% off
By displaying these offers directly on the product page, customers can quickly understand the available discounts and how much they can save when purchasing more.
Note: The Volume Discount extension is designed to be used on Product pages.
1. How to install the Volume Discount extension
Before creating a campaign, install the Volume Discount extension from your EComposer dashboard
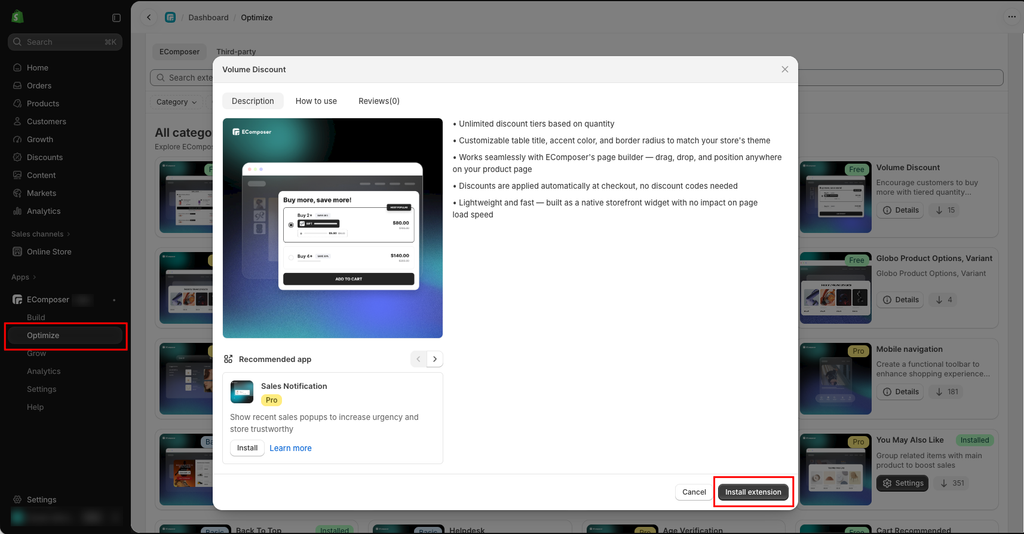
Step 1: From your EComposer dashboard, go to Optimize from the left sidebar menu.
Step 2: Search for the Volume Discount extension.
Step 3: Click Details and install the extension on your store.
2. Create a Volume Discount Campaign
After installing the extension, you can create a campaign and configure how the volume discount works and appears on your product pages.
Go to Optimize → Volume Discount → Open → Create Campaign to get started.
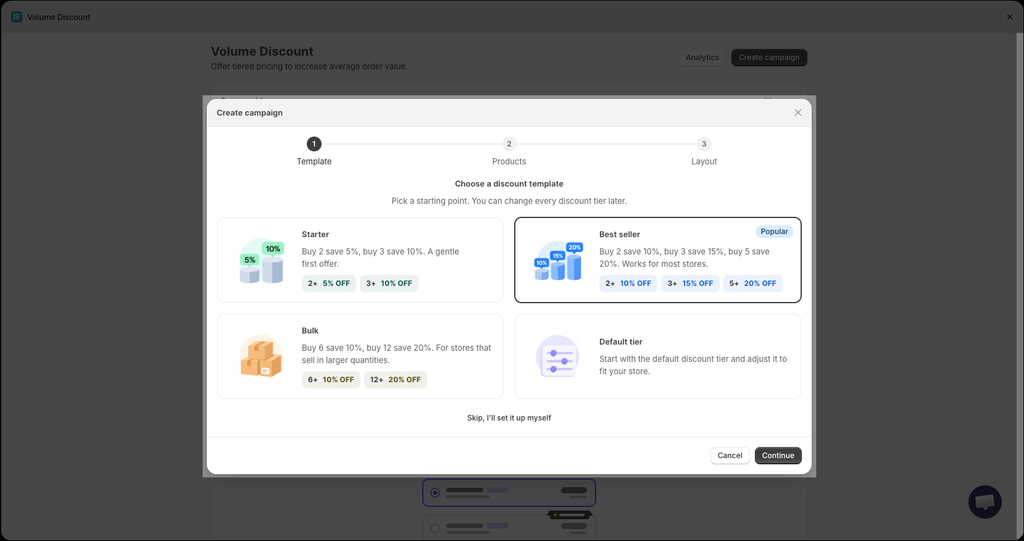
2.1. Choose a Discount Template
Choose a template to quickly create your discount tiers. You can customize the tiers after creating the campaign.
- Starter: A simple discount offer for encouraging customers to purchase slightly more.
- Best seller: A balanced tiered discount suitable for most stores.
- Bulk: A discount offer designed for stores where customers typically purchase larger quantities.
- Default tier: A basic discount tier that you can customize.
- Skip, I’ll set it up myself: Create your own discount tiers from scratch.
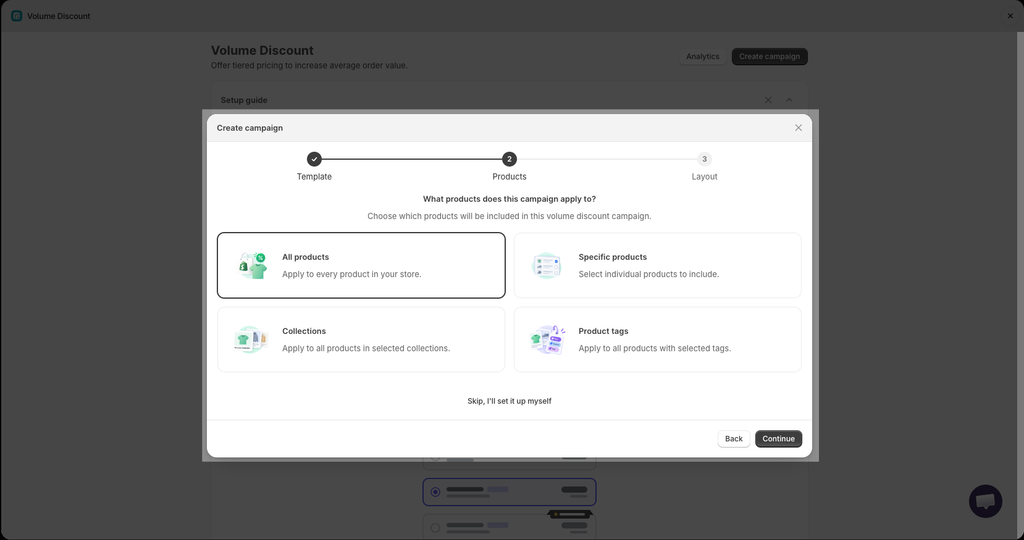
2.2. Select Products
Choose which products the campaign applies to.
- All products: Apply the campaign to all products in your store.
- Specific products: Apply the campaign only to selected products.
- Collections: Apply the campaign to products within selected collections.
- Product tags: Apply the campaign to products with selected tags.
2.3. Choose a Layout
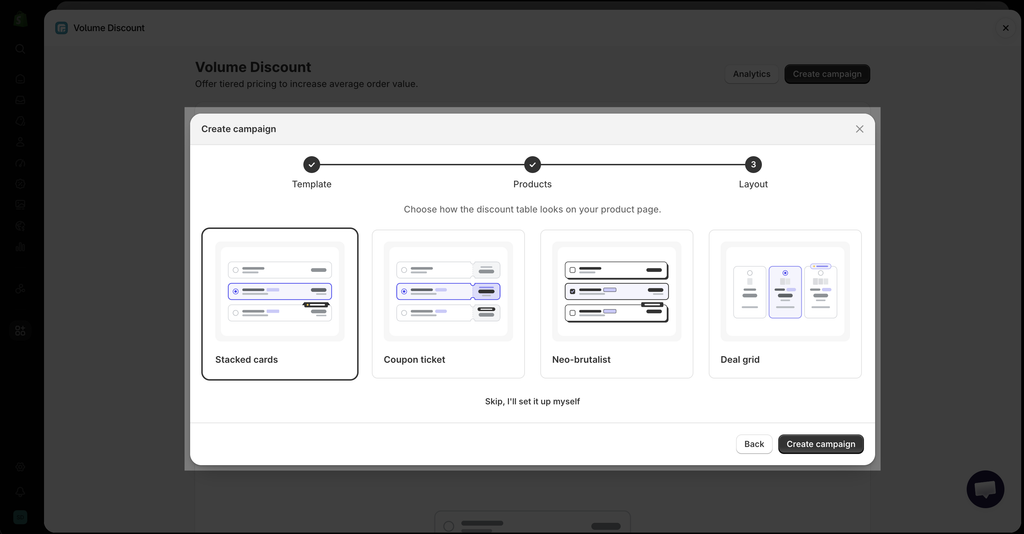
Choose how the discount offers will appear on your product page.
- Stacked cards: Display each discount tier in a separate card, making offers easy to scan and compare.
- Coupon ticket: Display each discount tier in a coupon-style design to make offers stand out.
- Neo-brutalist: Use a bold, high-contrast design with strong visual elements.
- Deal grid: Display multiple discount tiers in a compact grid.
Click Create Campaign to create the campaign.
3. Customize the Volume Discount Campaign
After creating your campaign, customize its rules, discount tiers, schedule, content, and other settings.
3.1. Rules & Tiers
Use Rules & Tiers to define when the discount applies and what customers need to purchase to unlock each discount.
- Rules: Define the conditions that determine when and how the volume discount applies.
- Tiers: Define the quantity thresholds and discount levels customers can unlock.
- For example: Buy 2+ → 5% OFF
Campaign
Manage the basic information and status of your campaign.
- Active campaign: Turn the campaign on or off.
- Campaign name: Set an internal name to help you identify and manage the campaign.
- Discount name: Set the name of the discount that customers will see at checkout.
- Description: Add an internal note about the campaign.
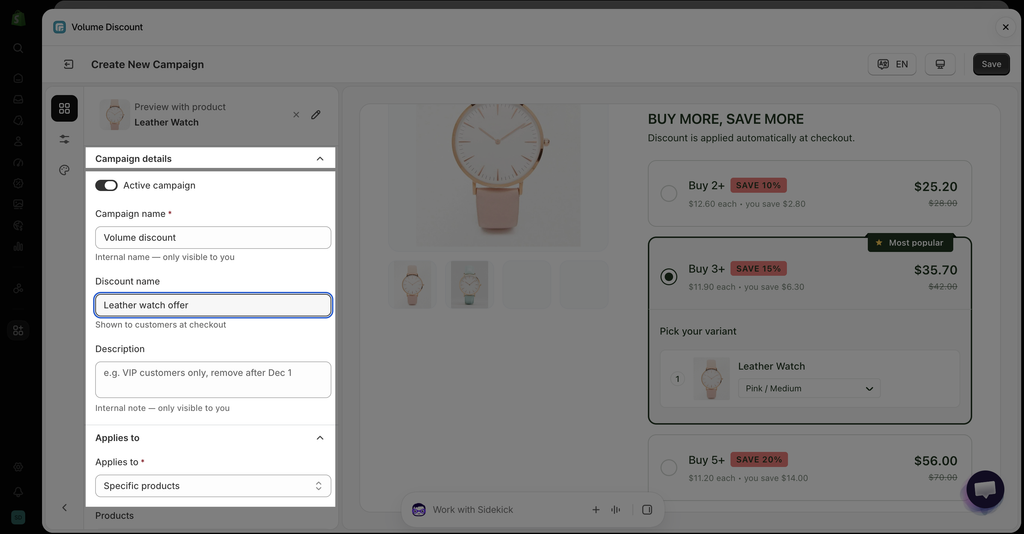
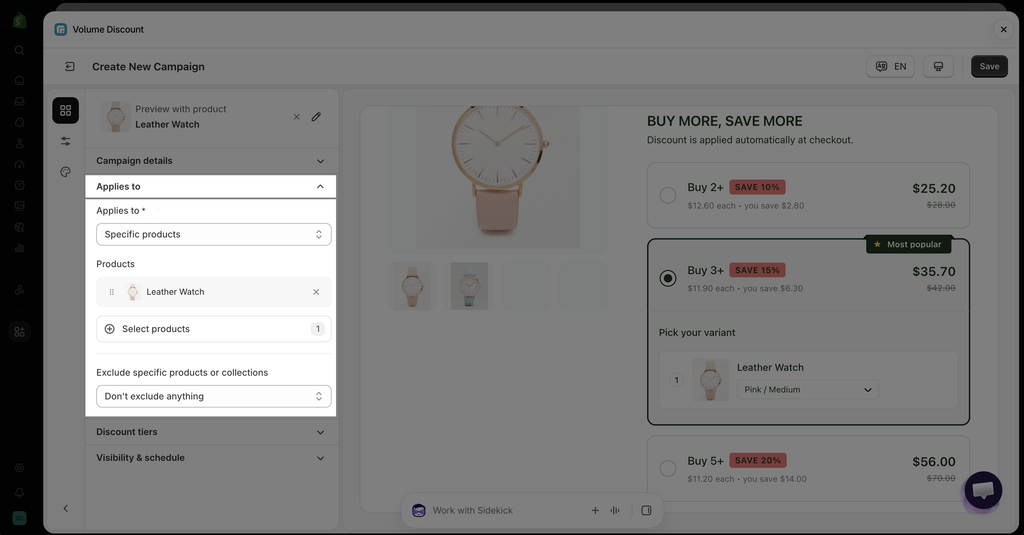
Applies to
- Choose which products or collections can use the volume discount.
- All products: Apply the discount to all products in your store.
- Specific products: Apply the discount only to selected products.
- Specific collections: Apply the discount to all products within selected collections.
- Product tags: Apply the discount to products with selected tags.
- Products: View and manage the products included in the campaign. This option is shown only when Specific products is selected in the Applies to setting.
- Select products: Add or remove products from the campaign.
- Exclude specific products or collections: Prevent selected products or collections from receiving the volume discount, even if they are otherwise included in the campaign.
- Don’t exclude anything: Apply the discount to all products included in the campaign without any exclusions.
- Exclude products: Select specific products to exclude from the volume discount.
- Exclude collections: Select specific collections to exclude from the volume discount.
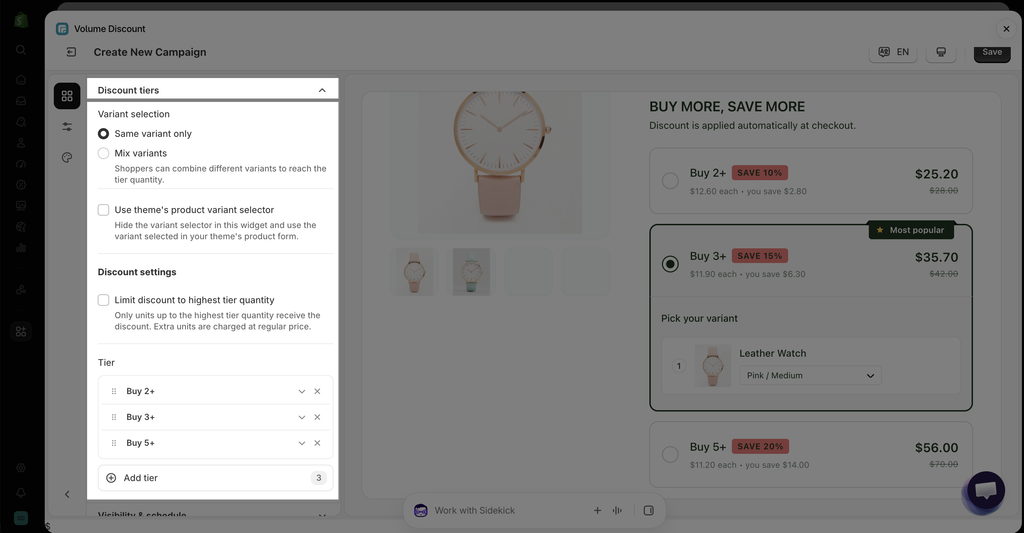
Discount Tiers
Define the quantity thresholds and discount levels customers can unlock.
- Same variant only: Customers must purchase the same product variant to reach a discount tier.
- Mix variants: Customers can combine different variants of the same product to reach the required quantity.
- Use theme’s product variant selector: Use the variant selector from your theme instead of displaying a separate variant selector in the Volume Discount widget.
- Limit discount to highest tier quantity: Apply the discount only to units up to the quantity of the highest tier reached. Additional units are charged at the regular price.
- Tier: Set the quantity required for each discount level, such as Buy 2+, Buy 3+, or Buy 5+.
- Add tier: Add another discount tier with a different quantity and discount level.
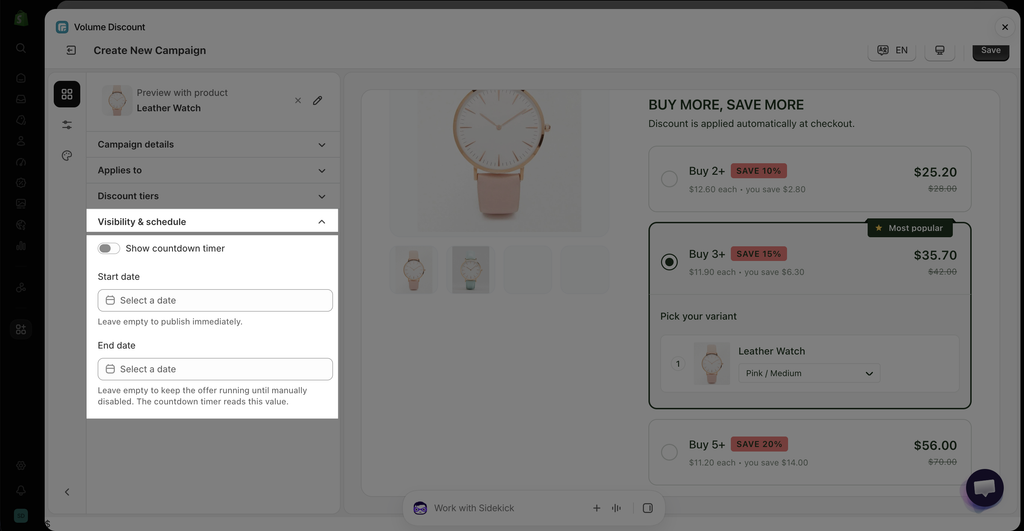
Visibility & Schedule
Control when the campaign is available and whether to display a countdown timer.
- Show countdown timer: Display a countdown showing the remaining time before the offer ends.
- Start date: Set when the campaign becomes active. Leave this empty to publish the campaign immediately.
- End date: Set when the campaign ends. Leave this empty to keep the campaign active until you manually disable it.
3.2. Advanced
Use the Advanced settings to customize the content and controls displayed in the Volume Discount widget.
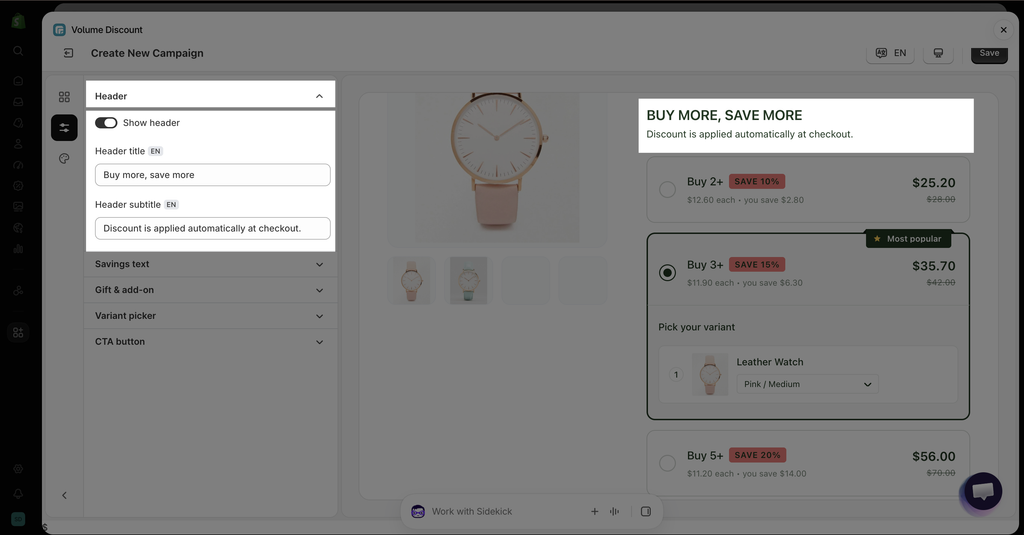
Header
- Show header: Show or hide the header section.
- Header title: Set the main title displayed at the top of the widget.
- Header subtitle: Set the supporting text displayed below the header title.
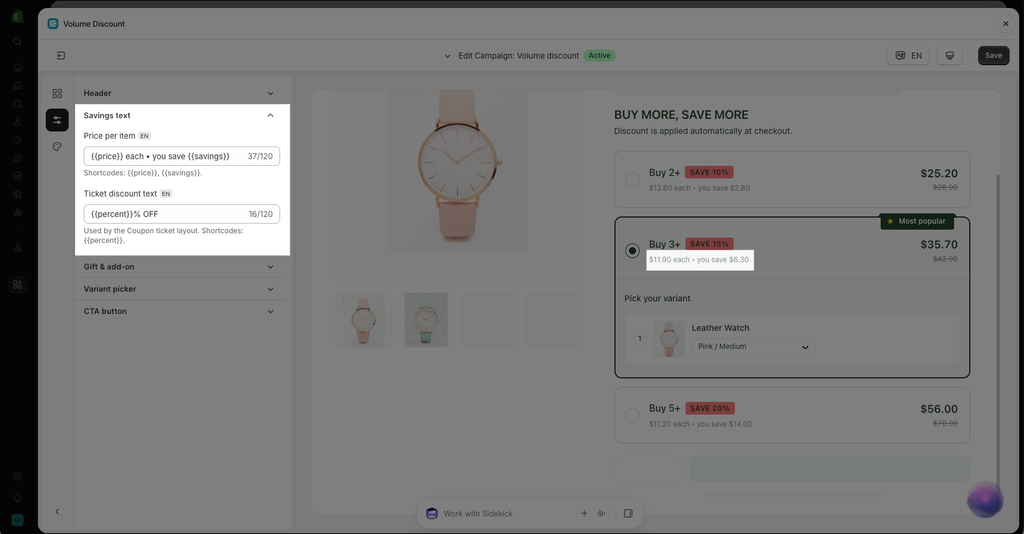
Savings Text
- Price per item: Set the text displayed for the price of each item. Use
{{price}}for the item price and{{savings}}for the amount saved. - Ticket discount text: Set the discount text displayed in the Coupon ticket layout. Use
{{percent}}for the discount percentage.
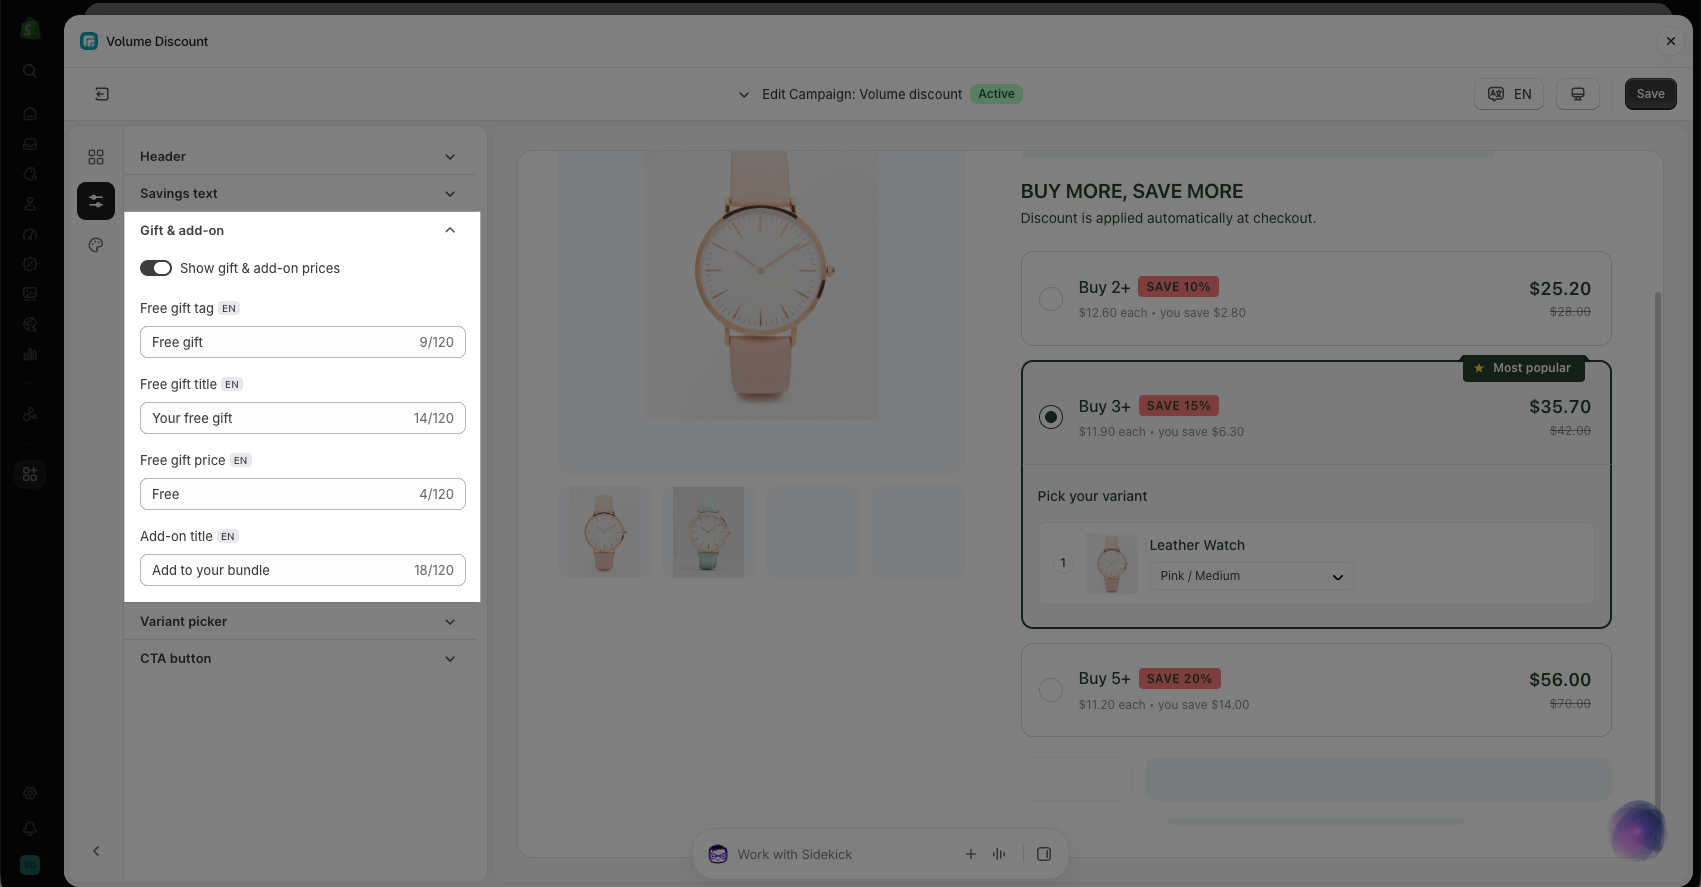
Gift & Add-on
- Show gift & add-on prices: Show or hide the prices of free gifts and add-on products.
- Free gift tag: Set the label used to identify a free gift.
- Free gift title: Set the title displayed for the free gift.
- Free gift price: Set the price displayed for the free gift.
- Add-on title: Set the title displayed for an add-on product.
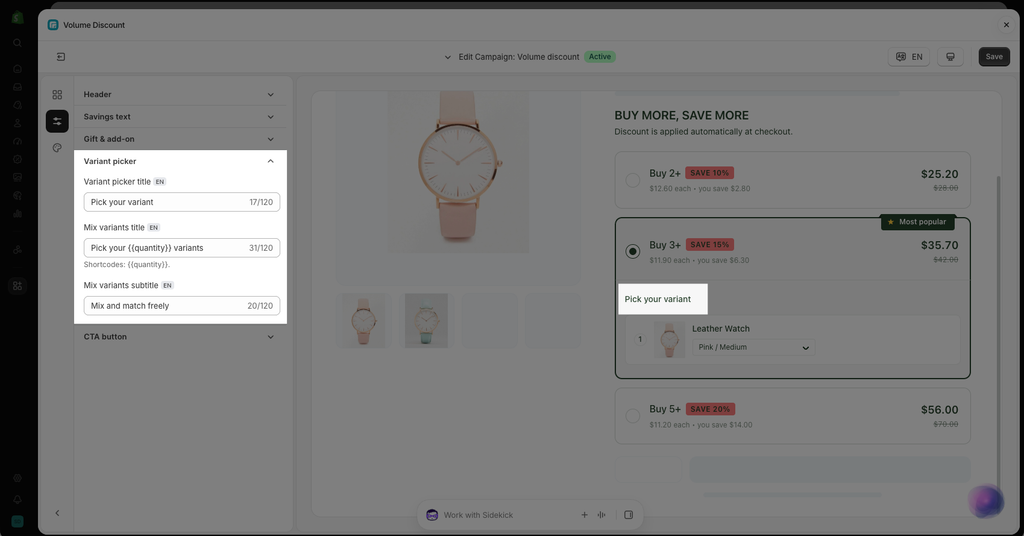
Variant Picker
- Variant picker title: Set the title displayed above the product variant selection area.
- Mix variants title: Set the title displayed when customers can combine different variants to reach the required quantity. Use
{{quantity}}to display the required quantity. - Mix variants subtitle: Set the supporting text displayed below the Mix variants title.
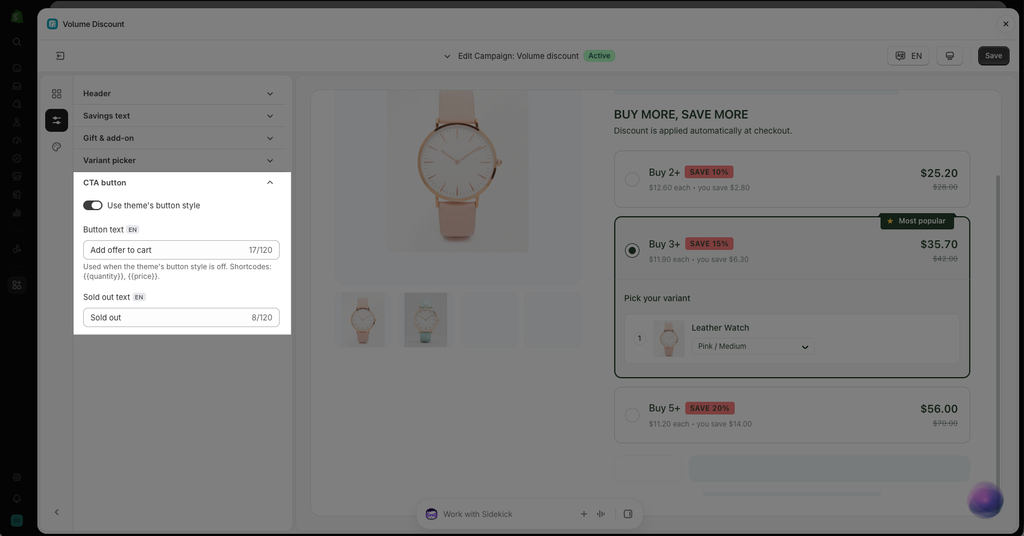
CTA Button
- Use theme’s button style: Use the button style configured in your store’s theme.
- Button text: Set the text displayed on the CTA button when the theme’s button style is disabled. Use
{{quantity}}for the selected quantity and{{price}}for the applicable price. - Sold out text: Set the text displayed on the CTA button when the selected product or variant is sold out.
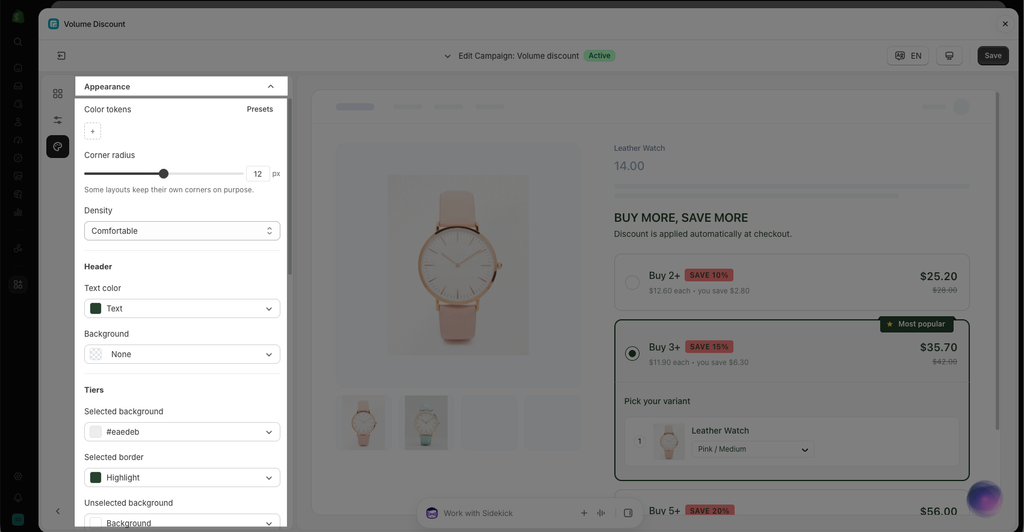
3.3. Appearance
Customize the visual style of the Volume Discount widget to match your store’s branding.
Color tokens
- Color tokens: Manage the colors used throughout the Volume Discount widget. These tokens allow you to keep the widget’s colors consistent across different elements.
Corner radius
- Corner radius: Set the roundness of the corners for the Volume Discount widget elements. Some layouts may use their own corner styles and are not affected by this setting.
Density
- Density: Control the overall spacing of the Volume Discount widget. Choose from Comfortable, Compact, or Spacious.
Header
- Text color: Set the color of the header text.
- Background: Set the background color of the header section.
Tiers
- Selected background: Set the background color of the currently selected discount tier.
- Selected border: Set the border color of the currently selected discount tier.
- Unselected background: Set the background color of discount tiers that are not selected.
- Unselected border: Set the border color of discount tiers that are not selected.
- Title text: Set the color of the discount tier title.
- Subtitle text: Set the color of the discount tier subtitle.
Pricing
- Price text: Set the color of the current or discounted price.
- Full price text: Set the color of the original price displayed before the discount.
Badges & labels
- Badge text: Set the text color used for badges.
- Badge background: Set the background color of badges.
- Label text: Set the text color used for labels.
- Label background: Set the background color of labels.
Variant selector
- Dropdown background: Set the background color of the variant selector dropdown.
- Dropdown text: Set the text color displayed in the variant selector dropdown.
4. Volume Discount Analytics
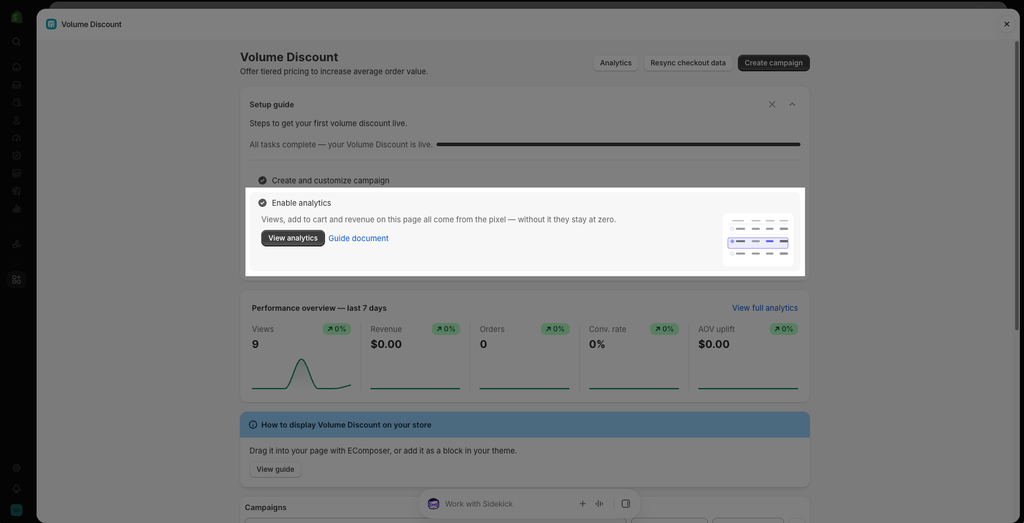
Use Volume Discount Analytics to monitor your campaign performance and understand how customers interact with your volume discount offers.
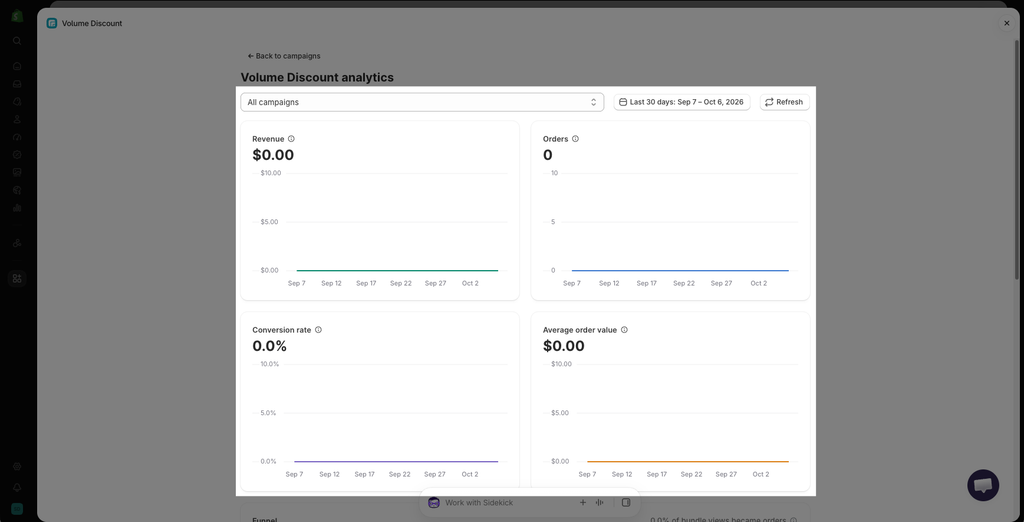
Overview
- Campaign: Select a specific campaign or All campaigns to view analytics for one campaign or all volume discount campaigns.
- Revenue: Shows the total revenue generated from orders placed through the volume discount campaign during the selected date range.
- Orders: Shows the total number of orders generated through the volume discount campaign during the selected date range.
- Conversion rate: Shows the percentage of customers who viewed the volume discount offer and then completed an order.
- Average order value: Shows the average value of orders generated through the volume discount campaign during the selected date range.
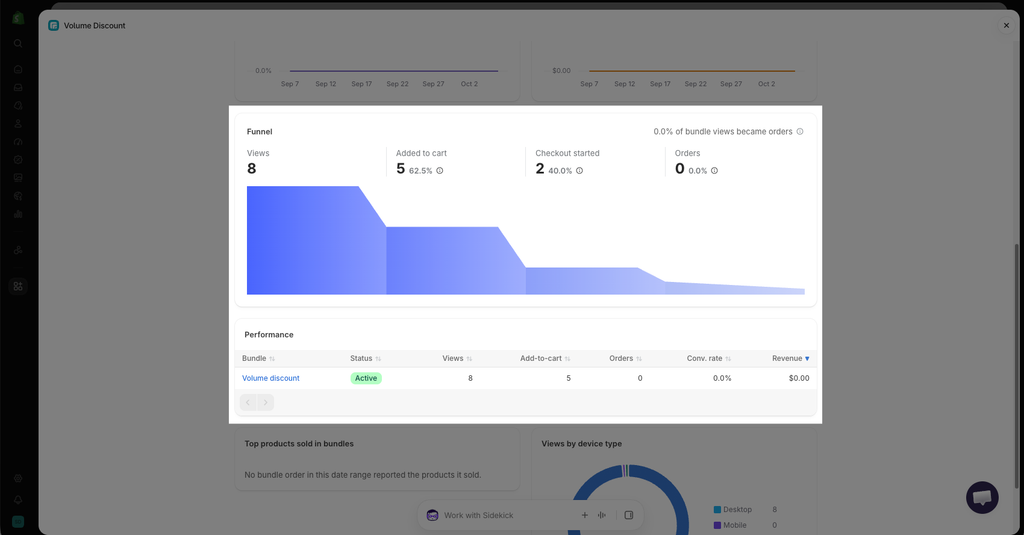
Funnel
- Views: Shows the number of times customers viewed the volume discount offer.
- Added to cart: Shows the percentage of volume discount views that resulted in products being added to the cart.
- Checkout started: Shows the percentage of volume discount views that resulted in customers starting the checkout process.
- Orders: Shows the percentage of volume discount views that resulted in completed orders.
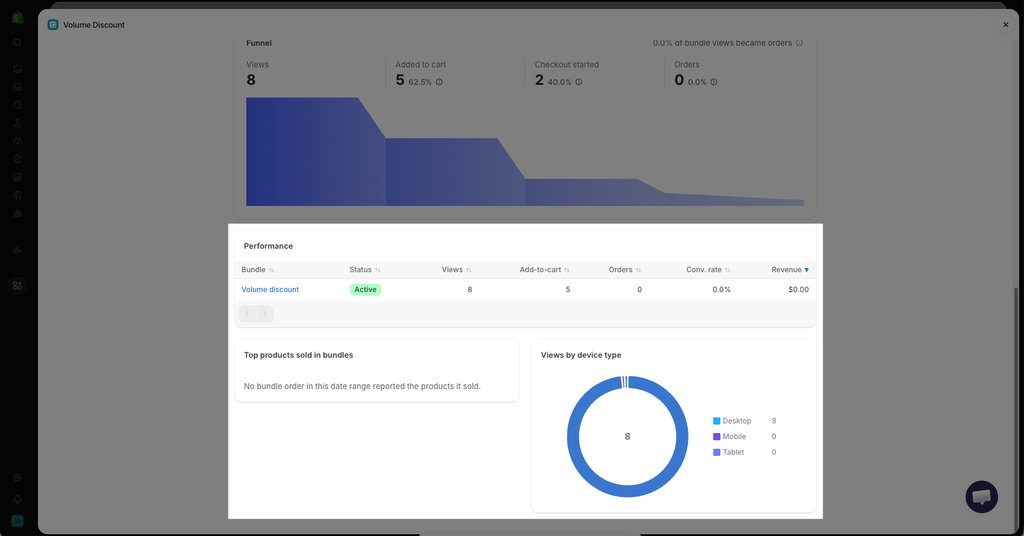
Performance
- Volume discount: Shows the performance of the volume discount campaign.
- Active: Indicates that the campaign is currently active.
- Views: Shows the number of times the campaign was viewed.
- Added to cart: Shows the number of times customers added products from the campaign to their cart.
- Orders: Shows the number of orders generated through the campaign.
- Conversion rate: Shows the percentage of campaign views that resulted in orders.
- Revenue: Shows the revenue generated from orders associated with the campaign.
Top products sold in bundles
- Top products sold in bundles: Shows the products most frequently sold through volume discount bundles during the selected date range.
Views by device type
- Views by device type: Shows the number of volume discount views by the device customers used to access the store.
- Desktop: Shows the number of views from desktop devices.
- Mobile: Shows the number of views from mobile devices.
- Tablet: Shows the number of views from tablet devices.
5. Add Volume Discount to Your Product page
After creating and customizing your campaign, add the Volume Discount widget to your product page. You can add it using EComposer or the Shopify Theme Editor.
5.1. Add Volume Discount in EComposer
- Step 1: Open the EComposer editor and select the Extensions tab from the left sidebar.
- Step 2: Find Volume Discount in your installed extensions list.
- Step 3: Drag the extension to your desired position on the page.
- Step 4: Configure the available content, discount tiers, layout, and styling settings.
Note: We recommend placing Volume Discount near the product quantity selector or Add to Cart button so customers can easily see the available offers before purchasing.
5.2. Add Volume Discount in the Shopify Theme Editor
You can also add Volume Discount directly from the Shopify Theme Editor.
- Step 1: From Shopify admin, go to Online Store → Themes → Customize.
- Step 2: Open the Product page or product template.
- Step 3: Click Add block → Apps → Customize.
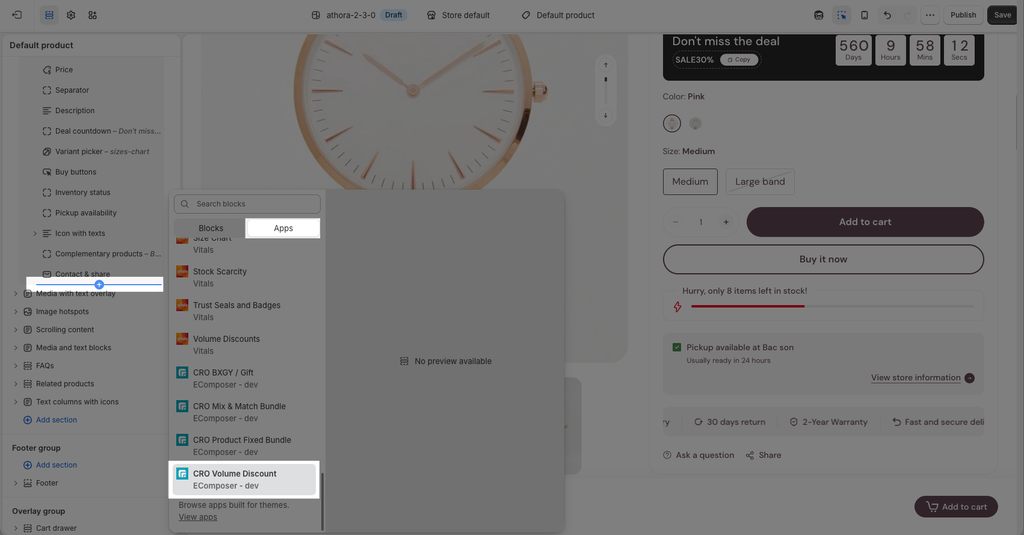
- Step 4: Move the block to your preferred position, ideally near the quantity selector or Add to Cart button.
- Step 5: Configure the available settings, then click Save.